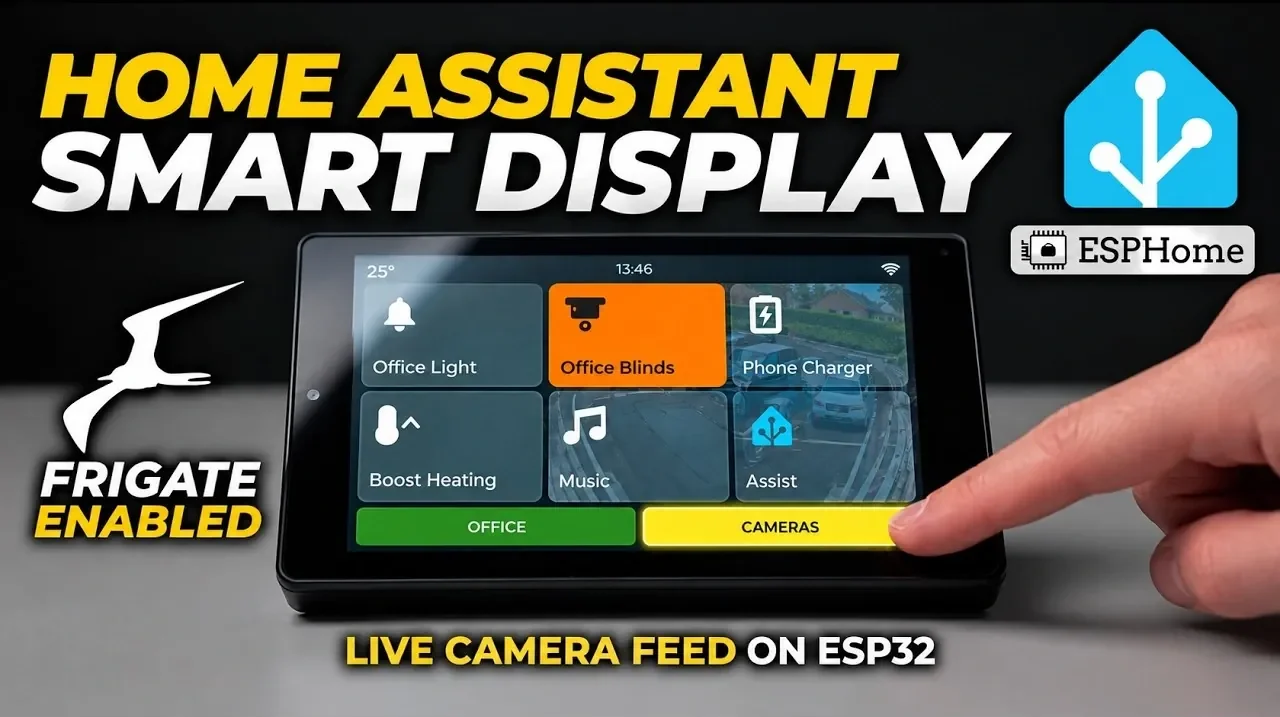
Building a smart office panel with an ESP32 device integrated into Home Assistant provides a compact and functional way to manage your connected environment. Automation Addict demonstrates how features like live camera feeds through Frigate, media playback controls and voice assistant integration can be combined into a single interface. Using frameworks such as the ESPHome Builder and the Home Assistant Community Store (HACS), the project enables control over devices like lights, blinds and outlets while supporting real-time monitoring and hands-free operation.
Explore how to configure the ESP32 device by setting up Wi-Fi credentials, customizing interface elements like icons and buttons and integrating live camera feeds with Frigate. Learn how to automate camera views for motion detection events and adjust media playback settings to suit your environment. Additionally, discover optional upgrades, such as incorporating external sensors or designing a 3D-printed case, to enhance both functionality and aesthetics.
Why Build an ESP32 Office Panel?
TL;DR Key Takeaways :
- The ESP32-based smart office panel integrates with Home Assistant, offering centralized control over entities like lights, blinds and power outlets for a streamlined smart home experience.
- Features include live camera feeds via Frigate (3-10 FPS), media playback with artwork display and voice assistant functionality for hands-free operation.
- Configuration involves using tools like ESPHome Builder and HACS, setting Wi-Fi credentials and customizing buttons, icons and camera entities for tailored functionality.
- Automation and customization options allow for advanced workflows, such as automating camera views, modifying interface elements and scripting with YAML for personalized setups.
- Optional enhancements, like 3D-printed cases, external sensors and additional displays, can expand the panel’s capabilities and improve its aesthetics and functionality.
An ESP32-based office panel provides a streamlined approach to managing your smart home by offering a centralized control interface. Its versatility and functionality make it an essential tool for smart home enthusiasts. Key features include:
- Comprehensive control over Home Assistant entities, such as lights, blinds and power outlets, allowing you to manage your environment effortlessly.
- Integration with Frigate for live camera feeds, supporting 3-10 FPS for compatible cameras, allowing real-time monitoring of your home or office.
- Media playback functionality, including artwork display and playback controls, for seamless entertainment management.
- Voice assistant satellite integration, allowing voice commands through Home Assistant Voice for hands-free operation.
This combination of features ensures the panel is both functional and adaptable, whether you’re monitoring security cameras, controlling devices, or managing daily routines. It simplifies complex tasks and centralizes control, making it an invaluable addition to your smart home setup.
What You’ll Need to Get Started
Before diving into the setup, it’s essential to gather the necessary tools and software to configure the ESP32 device and integrate it into your Home Assistant system. Here’s what you’ll need:
- Home Assistant Community Store (HACS) for integrating Frigate and other custom components.
- ESPHome Builder to configure and program the ESP32 device according to your specific requirements.
- Home Assistant Voice for allowing voice command functionality.
- A viewer account in Frigate to securely access live camera feeds with limited permissions.
These components form the foundation of your project, making sure seamless communication between the ESP32 device and your smart home ecosystem. Proper preparation will save time and ensure a smoother setup process.
Find more information on ESP32 by browsing our extensive range of articles, guides and tutorials.
- $5 ESP32-S3 Super Mini Packs Wi-Fi and Bluetooth
- How an $8 ESP32 S3 Microcontroller Runs a 28.9M Parameter Local LLM
- $4 ESP32 Module Brings Wi-Fi and Bluetooth to IoT Projects
- ESP32-S3 Super Mini Brings 240 MHz Dual-Core Power For $4
- ESP32 S31 Devkit Hands-on: 320 MHz RISC-V Chip Adds Wi-Fi 6
- $4 ESP32-S3 Super Mini Packs a 0.96-Inch IPS TFT Screen
- Build a DIY Open source Flipper Zero Using a ESP32-DIV
- WaveShare ESP32-C5 Offers 32MB Flash and Sensors For $20
- $9 CYD ESP32 Module Includes a 2.88-Inch LCD Screen
- ESP32-S3 Super Mini Costs $5 and Packs Wi-Fi and Bluetooth
Integrating Frigate for Live Camera Feeds
Frigate is a critical component for allowing live camera feeds on your office panel. It provides real-time monitoring capabilities, enhancing security and convenience. To integrate Frigate with Home Assistant, follow these steps:
- Install the Frigate integration through HACS to enable compatibility with Home Assistant.
- Configure the Frigate API port (default: 8971) to allow access to camera feeds.
- Optionally disable TLS for faster performance on local networks, but only in secure environments to avoid potential vulnerabilities.
This setup allows you to monitor live feeds from Frigate-compatible cameras directly on your panel. Whether you’re checking on your home while at work or monitoring office activity, this feature provides peace of mind and convenience.
Configuring the ESP32 Device
The ESP32 device serves as the backbone of your office panel, allowing communication between the hardware and Home Assistant. Using ESPHome Builder, you can configure and customize the device to meet your specific needs. Key configuration steps include:
- Setting Wi-Fi credentials to connect the device to your home or office network.
- Specifying IP addresses for Frigate and Home Assistant to ensure seamless integration.
- Customizing buttons, icons and camera entities to reflect your preferred layout and functionality.
- Adjusting screen brightness and idle dimming settings for optimal usability and energy efficiency.
These configurations ensure the ESP32 device is fully integrated and ready to function as a versatile control panel. Proper customization allows you to tailor the panel to your unique requirements, enhancing its usability and effectiveness.
Automation and Customization Options
One of the most powerful aspects of this project is the ability to automate and customize the office panel to suit your specific needs. Automation can simplify repetitive tasks, while customization ensures the interface aligns with your preferences. Examples include:
- Automating camera views to switch when specific events occur, such as a doorbell press or motion detection.
- Modifying button labels and icons to reflect specific functions, making the interface intuitive and user-friendly.
- Adding or adjusting camera feeds and media player settings to enhance functionality.
- Using YAML scripting to create advanced automations and workflows tailored to your smart home setup.
This flexibility allows you to create a personalized experience that integrates seamlessly with your smart home. Whether you’re optimizing for security, convenience, or entertainment, the possibilities are virtually endless.
Installation and Troubleshooting
After completing the configuration, the next step is to flash the ESP32 device with the customized code and integrate it with Home Assistant. During installation, keep the following in mind to ensure a smooth process:
- Check logs in both ESPHome and Home Assistant to verify that the device is communicating correctly.
- Address connectivity issues promptly, such as incorrect IP addresses or network settings, to avoid disruptions.
- Test all functionalities, including camera feeds, media playback and voice commands, to confirm proper integration.
Troubleshooting during this phase is crucial to ensure the panel operates as intended. By systematically addressing any issues, you can achieve a reliable and efficient setup.
Optional Enhancements
To further enhance your office panel, consider incorporating optional features and components. These additions can improve both the functionality and aesthetics of your project. Examples include:
- Using a 3D-printed case to create a clean, professional-looking enclosure for your panel.
- Adding external sensors, such as temperature or humidity sensors, to expand the panel’s capabilities.
- Exploring additional displays or hardware components to create a more versatile interface.
These enhancements allow you to tailor the panel to your specific needs, making it an even more valuable addition to your smart home or office.
Maximizing the Potential of Your ESP32 Office Panel
The ESP32 Screen Home Assistant Office Panel is a powerful and customizable solution for managing your smart home or office. By combining control over Home Assistant entities, live camera feeds, media playback and voice commands, this project delivers a centralized interface tailored to your needs. With detailed instructions for setup, configuration and customization, you can create a solution that simplifies your smart home management while enhancing your overall experience. Whether you’re optimizing for security, convenience, or entertainment, this project offers a versatile and efficient way to take control of your smart home ecosystem.
Media Credit: Automation Addict
Disclosure: Some of our articles include affiliate links. If you buy something through one of these links, Geeky Gadgets may earn an affiliate commission. Learn about our Disclosure Policy.
