What if your compact, reliable UGREEN NAS could do even more? Imagine transforming it into a powerhouse of customization and performance, capable of handling advanced storage configurations and unlocking features you didn’t know you needed. By installing TrueNAS Scale, you can take your UGREEN NAS beyond its pre-installed operating system, opening up a world of possibilities for both personal and professional use. Whether you’re a home user managing a growing media library or a small business owner seeking robust data solutions, this upgrade promises to redefine what your NAS can achieve. The process might sound technical, but with the right guidance, it’s simpler than you think, and the results are well worth it.
In this guide, SpaceRex takes you through how to seamlessly install TrueNAS Scale on your UGREEN NAS, step by step. From preparing your hardware and configuring the BIOS to optimizing storage with advanced setups like RAID Z2, this guide ensures you’re equipped to make the most of your system. Along the way, you’ll learn why the UGREEN NAS’s dual NVMe SSD slots and eight drive bays make it an ideal candidate for this transformation. But this isn’t just about installation, it’s about unlocking the full potential of your NAS and tailoring it to your unique needs. By the end, you’ll not only have a more powerful storage solution but also a deeper understanding of what makes TrueNAS Scale a fantastic option for modern data management.
Upgrading UGREEN NAS to TrueNAS
TL;DR Key Takeaways :
- Upgrading a UGREEN NAS to TrueNAS Scale enhances functionality, performance, and customization options, making it suitable for both home and small business use.
- The UGREEN NAS features eight drive bays, dual NVMe SSD slots, and a pre-installed UGREEN OS, offering flexibility and reliability for diverse storage needs.
- Preparation steps include creating a bootable USB drive, accessing the BIOS, and disabling the “Watchdog” feature to ensure a smooth installation process.
- Installing TrueNAS Scale involves configuring the BIOS, selecting an NVMe SSD for installation, and setting up RAID Z2 for balanced data redundancy and performance.
- TrueNAS Scale unlocks advanced features like virtualization, containerization, and off-site backups, making the UGREEN NAS a versatile and powerful storage solution.
What Makes the UGREEN NAS Stand Out?
The UGREEN NAS is a compact yet powerful storage solution designed to meet diverse needs, from personal use to small business applications. Its hardware is optimized for reliability and flexibility, offering features that cater to both novice and advanced users. Key highlights of the UGREEN NAS include:
- Eight drive bays capable of supporting high-capacity hard drives, making it ideal for users with extensive storage requirements.
- Dual NVMe SSD slots that can be used for operating system installation or high-speed caching, enhancing overall system performance.
- A pre-installed UGREEN OS, which provides a functional out-of-the-box experience but can be replaced with TrueNAS Scale for greater customization.
This hardware is particularly well-suited for advanced storage configurations, such as RAID Z2, which balances data redundancy with performance. Its compact design and robust features make it an excellent choice for users seeking a reliable and adaptable storage solution.
Step 1: Preparing for Installation
Proper preparation is essential to ensure a seamless installation process. Before you begin, gather the necessary tools and follow these steps:
- Download the TrueNAS Scale installer and create a bootable USB drive using software like Balena Etcher. This will serve as your installation media.
- Restart the UGREEN NAS and access the BIOS by pressing Ctrl+F12 during startup. This allows you to configure essential hardware settings.
- Disable the “Watchdog” feature in the BIOS to prevent unexpected reboots during the installation process.
Taking these preparatory steps minimizes the risk of errors and ensures that your system is ready for the installation of TrueNAS Scale.
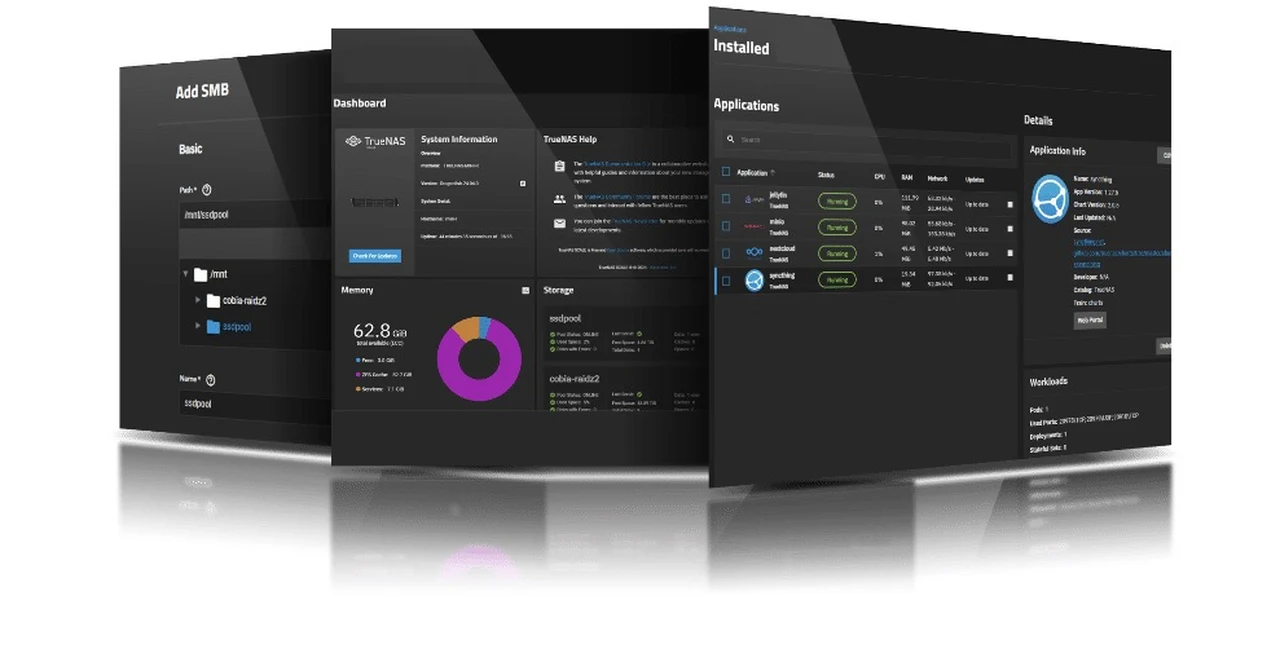
Installing TrueNAS on a UGREEN NAS Storage Unit

Below are more guides on NAS systems from our extensive range of articles.
- Synology NAS Drops HEVC Support: What It Means for Users
- TerraMaster F2-223 & F4-223 NAS with TRAID
- SSD vs HDD NAS storage compared which is best?
- How to Set Up a Synology NAS: A Beginner’s Guide 2025
- Build a 4-Bay Raspberry Pi 5 NAS With RAID 5 & Swappable Drives
- Building a NAS using a RISC-V BPI-F3 and OpenMediaVault
- QNAP NAS storage solutions
- 3 Mini NAS Devices Compared: Speed, Storage, and Performance
- How to soft reset your Synology NAS if you are locked out
- Synology NAS Home vs Homes folders explained
Step 2: Configuring the BIOS
The BIOS serves as the control center for your NAS hardware, and configuring it correctly is a critical step in the installation process. Adjust the following settings to optimize your system for TrueNAS Scale:
- Enable the NVMe slots to ensure that TrueNAS Scale can be installed on an SSD, which provides faster performance compared to traditional hard drives.
- Set the boot order to prioritize the USB drive containing the TrueNAS installer. This ensures the system boots directly into the installation environment.
These configurations ensure that your NAS hardware is properly aligned with the requirements of TrueNAS Scale, paving the way for a smooth installation.
Step 3: Installing TrueNAS Scale
With the BIOS configured, you can proceed to install TrueNAS Scale. Follow these steps to complete the process:
- Insert the bootable USB drive into the NAS and restart the system. The TrueNAS installer will load automatically.
- Select an NVMe SSD as the installation target. This approach avoids overwriting the pre-installed UGREEN OS, preserving your ability to revert if needed.
- Follow the on-screen prompts to set up the TrueNAS administrator account and password. This account will give you access to the system’s management interface.
- After installation, configure your storage pool using RAID Z2. This setup provides a balance of data redundancy and performance, making sure your data is secure and accessible.
By installing TrueNAS Scale on a separate drive, you retain the flexibility to switch back to the UGREEN OS if necessary, offering a dual-system advantage.
Important Considerations Before Switching
While TrueNAS Scale offers numerous benefits, there are a few factors to consider before making the switch. These considerations will help you make an informed decision:
- To preserve the original UGREEN OS, install TrueNAS Scale on a separate NVMe SSD rather than overwriting the existing system.
- The ZFS file system used by TrueNAS is highly reliable but may limit compatibility if you decide to revert to the UGREEN OS in the future.
- Familiarity with BIOS settings and the process of creating bootable media is essential for a successful installation.
Understanding these points ensures that you are fully prepared for the transition and can maximize the benefits of your new setup.
Who Benefits Most from the UGREEN NAS?
The UGREEN NAS is designed to cater to a wide range of users, offering features that make it suitable for various applications. Its versatility makes it an excellent choice for:
- Home users seeking a centralized storage solution for media, backups, and file sharing.
- Small businesses in need of reliable data storage and sharing capabilities to support daily operations.
- Off-site backup setups to safeguard critical data in case of local hardware failures or disasters.
With its user-friendly design and robust hardware, the UGREEN NAS is accessible even to those with limited technical expertise, making it a practical choice for a wide audience.
Exploring Advanced Configurations
After successfully installing TrueNAS Scale, you can explore additional configurations to further enhance your system’s capabilities. Consider the following options:
- Experimenting with advanced TrueNAS features, such as virtualization and containerization, to expand the functionality of your NAS.
- Testing different RAID levels and storage pool setups to optimize performance and redundancy based on your specific needs.
- Integrating off-site backup solutions to enhance data security and ensure disaster recovery readiness.
These advanced configurations allow you to unlock the full potential of your UGREEN NAS and TrueNAS Scale setup, tailoring it to your unique requirements.
Media Credit: SpaceRex
Disclosure: Some of our articles include affiliate links. If you buy something through one of these links, Geeky Gadgets may earn an affiliate commission. Learn about our Disclosure Policy.