Building a Samsung Galaxy S22 Ultra using parts sourced from AliExpress is an intriguing concept for tech enthusiasts. It offers the allure of a hands-on project and the possibility of saving money compared to purchasing a new or refurbished device. However, this endeavor is far from simple. It requires navigating a series of challenges, including sourcing compatible components, ensuring quality, and managing the complexities of assembly. Below is a detailed exploration of the process in a great new video from Phone Repair Guru, the obstacles you may encounter, and whether this DIY approach is worth pursuing.

Sourcing Components – A Balancing Act Between Cost and Quality
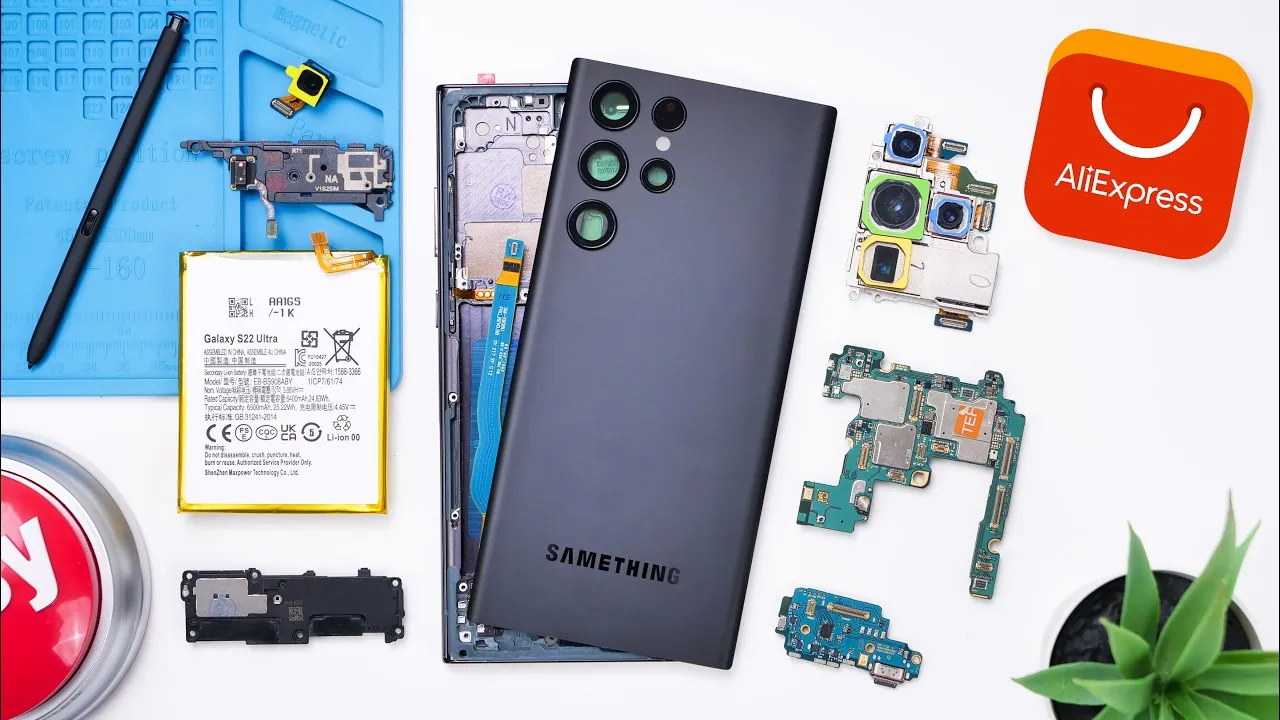
The first step in building a smartphone is acquiring all the necessary components. For the Galaxy S22 Ultra, this includes critical parts such as the motherboard, display, cameras, battery, and smaller items like screws and adhesives. AliExpress provides a wide range of these components, but the quality and compatibility of the parts can vary significantly.
- Motherboard: As the most expensive component, priced at $174 CAD, the motherboard was functional but lacked the rigorous quality control associated with official Samsung parts. This raises concerns about long-term reliability.
- Display: The screen, while functional, had thicker bezels and lower visual quality compared to the original. This compromises the premium experience expected from a flagship device.
- S Pen: Although included, the S Pen lacked Bluetooth functionality, significantly reducing its capabilities compared to the original accessory.
These examples highlight the inherent risks of sourcing parts from third-party vendors. While some components may work adequately, others may fall short of the standards set by official Samsung products. This variability can lead to a final product that feels inconsistent and less refined.
Assembly – Precision, Patience, and Problem-Solving
Once all the components are gathered, the next step is assembling the device. This process demands a high level of precision and patience. It involves installing the motherboard, attaching the cameras, securing the battery, and aligning the display with the frame. However, the assembly process is far from straightforward and presents several challenges.
- Missing Parts: Some screws and smaller components were not included, requiring additional purchases or creative improvisation to complete the assembly.
- Adhesive Issues: Pre-installed adhesives complicated the process, particularly when aligning the screen with the frame. Misalignment can compromise the device’s structural integrity.
- Lack of Instructions: Many components arrived without detailed guides, forcing reliance on online tutorials and trial-and-error methods. This can be especially daunting for those without prior experience in smartphone repair.
Even minor errors during assembly can lead to significant issues, such as a misaligned screen or improperly connected components. For individuals without technical expertise, this step can be both time-consuming and frustrating.
Functionality Testing – Evaluating the Final Product
After assembly, the device must be thoroughly tested to ensure it functions as intended. In this case, the phone powered on and was capable of performing basic tasks such as calling, texting, and browsing. However, several shortcomings became apparent during functionality testing.
- Vibration Motor: The vibration motor was non-functional, detracting from the overall user experience.
- S Pen Limitations: The lack of Bluetooth functionality in the S Pen reduced its usability, particularly for advanced features.
- Display Quality: The screen exhibited muted colors and lower brightness compared to an original Samsung display, further diminishing the premium feel of the device.
While the phone was operational for basic tasks, these issues significantly impacted its overall performance and usability. The absence of premium features and the presence of functional gaps raise questions about the practicality of this DIY approach.
Cost Analysis – Savings Versus Compromises
The total cost of the components for this DIY build was $427.72 CAD, making it approximately $100 cheaper than purchasing a refurbished Galaxy S22 Ultra. However, the cost savings come with notable trade-offs that must be carefully considered.
- Time Investment: The assembly process is labor-intensive and requires a significant time commitment, especially for those unfamiliar with smartphone repair.
- Quality Concerns: The variability in component quality introduces unpredictability, which can affect the durability and performance of the final product.
- Functionality Gaps: Missing or subpar features, such as the non-functional vibration motor and lower-quality display, detract from the overall user experience.
When compared to a refurbished device, which undergoes rigorous testing and quality assurance, the DIY approach falls short in delivering a comparable experience. The modest cost savings may not justify the time, effort, and compromises involved in this project.
Is Building Your Own Galaxy S22 Ultra Worth It?
Assembling a Samsung Galaxy S22 Ultra using AliExpress parts is a technically feasible project, but it comes with significant challenges. While this endeavor may appeal to tech-savvy individuals or repair enthusiasts, it requires careful consideration of the potential drawbacks. Sourcing compatible components, navigating the complexities of assembly, and addressing functionality issues are all part of the process.
The final product, though functional, lacks the polish, reliability, and premium feel of an original or refurbished device. For most users, the modest cost savings are outweighed by the time, effort, and compromises involved. If you are considering this DIY approach, it is essential to evaluate whether the potential drawbacks align with your goals and expectations. For many, purchasing a refurbished device may offer a more reliable and hassle-free alternative.
Dive deeper into Samsung Galaxy S22 Ultra assembly with other articles and guides we have written below.
- iPhone 16 Pro Max vs S24 Ultra: The ULTIMATE Drop Test
- Play AAA PC games on your Galaxy S24 Ultra phone
- Google Pixel 9 Gets Taken Apart (Video)
- Samsung One UI 7 Update: Battery Drain and Overheating Issues
- Five Proven Ways to fix Samsung logo if My Phone is stuck on
Source & Image Credit: Phone Repair Guru
Disclosure: Some of our articles include affiliate links. If you buy something through one of these links, Geeky Gadgets may earn an affiliate commission. Learn about our Disclosure Policy.