
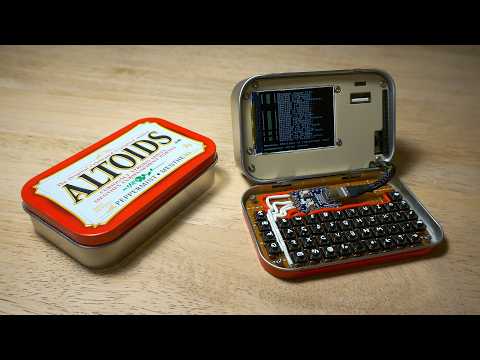
Transforming an Altoids tin into a functional cyberdeck demonstrates the possibilities of compact computing within constrained spaces. Exercising Ingenuity details the process of fitting a Raspberry Pi Zero, a 2-inch LCD screen and a custom mechanical keyboard into the small container. The project involved precise modifications, such as extending the tin’s hinges and incorporating a 3D-printed frame to securely house the components, making sure both durability and usability despite the limited dimensions.
Discover how the GPIO pin breakout expands prototyping options, how the UPS Hat maintains reliable power and how thermal pads address heat management in the confined setup. Gain insight into the design elements, including engraved labels and a retro-inspired faceplate, that balance functionality with visual appeal. This deep dive unpacks the technical and creative decisions behind crafting a compact DIY computing device.
Altoids Tin Cyberdeck
TL;DR Key Takeaways :
- The project transforms an Altoids tin into a fully functional cyberdeck, combining creativity and engineering for light prototyping and small-scale computing tasks.
- Key components include a Raspberry Pi Zero, a 2-inch LCD display, a custom mechanical keyboard and a UPS Hat for portable power management.
- Challenges such as space constraints, display configuration and structural modifications were addressed with precise planning, custom 3D-printed frames and hinge adjustments.
- Additional features like GPIO pin breakout, a USB hub and thermal management expand the device’s functionality and reliability.
- Aesthetic refinements, including engraved labels and a vintage-inspired faceplate, enhance usability and visual appeal, making the cyberdeck both practical and stylish.
The Altoids tin is an ideal enclosure for this project due to its durability, compact size and widespread availability. Its portability and sturdy metal construction make it well-suited for housing delicate electronic components. However, its small size presents a unique challenge: fitting multiple components into such a confined space without compromising functionality. To achieve this, precise modifications to the tin are required to accommodate the hardware while maintaining its structural integrity.
Essential Components for the Cyberdeck
The functionality of the cyberdeck depends on a carefully curated selection of components, each chosen for its specific role in the device:
- Raspberry Pi Zero: Acting as the brain of the cyberdeck, this single-board computer runs Raspberry Pi OS and manages all connected peripherals. Its compact size and versatility make it an excellent choice for space-constrained projects.
- 2-inch LCD Display: This small screen, connected via an SPI interface, provides a functional display for basic output. Its size strikes a balance between usability and the limited space available.
- Custom Mechanical Keyboard: Built using a diode matrix and programmed with KMK firmware, this miniature keyboard delivers a tactile typing experience while demonstrating the adaptability of DIY electronics.
- UPS Hat: A power management module ensures uninterrupted power, allowing the cyberdeck to function as a portable and self-sufficient device.
Check out more relevant guides from our extensive collection on cyberdecks that you might find useful.
- Build a Modular Cyberdeck for Ultimate Portable Computing Power
- Awesome Backpack Cyberdeck powered by overclocked Raspberry Pi
- Razer Edge Cyberdeck Runs Android 12 and Handles GameCube, PS2, and Cloud Gaming
- How to Build an Awesome LattePanda Mu Cyberdeck
- LattePanda Iota Review : Tiny Windows and Linux PC Built for 4K Thrills
- ClockworkPi uConsole Linux handheld PC from $139
- Inside the Cyberdeck-Inspired Smartphone Designed Entirely Around a Physical Keyboard
- Cyberdeck Windows PC made from Framework modular components
- Awesome Raspberry Pi Cyberdeck : Modular Design and Dual Screens
Addressing Design Challenges
Building a cyberdeck within the confines of an Altoids tin requires innovative problem-solving to overcome several challenges:
- Space Constraints: The limited interior space necessitated meticulous planning. Components were resized, soldered and arranged with precision. A custom 3D-printed frame was also designed to securely hold the hardware in place.
- Display Configuration: Making sure compatibility between the Raspberry Pi OS and the 2-inch LCD display required careful adjustments to the SPI interface and software settings to optimize performance.
- Structural Modifications: The tin’s hinges were extended to allow it to close properly without damaging the internal components. This modification preserved both the device’s durability and functionality.
Expanding the Cyberdeck’s Capabilities
To enhance the cyberdeck’s functionality, additional features were integrated, making it more versatile and practical:
- GPIO Pin Breakout: This feature allows for prototyping and experimentation with external hardware, expanding the device’s potential applications.
- USB Hub: A compact USB hub provides external connectivity, allowing the attachment of peripherals such as a mouse, keyboard, or external storage devices.
- Thermal Management: A thermal pad was installed to dissipate heat effectively, making sure the Raspberry Pi Zero operates reliably within the confined space of the tin.
Attention to Detail and Aesthetic Refinements
Beyond functionality, attention was given to the cyberdeck’s aesthetics and usability. Engraved labels were added to identify ports and GPIO pins, making the device more intuitive to use. The faceplate was painted to give the cyberdeck a polished, vintage appearance, enhancing its visual appeal. Additionally, the tin was carefully adjusted to close securely, protecting the internal components during transport and making sure durability.
A Compact Marvel of DIY Engineering
The completed cyberdeck is a testament to creative engineering and resourceful design. Compact yet functional, it is perfect for light prototyping, small computing tasks, or as a demonstration of DIY innovation. By repurposing an Altoids tin and integrating thoughtfully selected components, you can create a unique device that highlights the potential of small-scale electronics projects. Whether used as a practical tool or as a conversation starter, this cyberdeck exemplifies what can be achieved with ingenuity, technical skill and a passion for DIY electronics.
Media Credit: Exercising Ingenuity
Disclosure: Some of our articles include affiliate links. If you buy something through one of these links, Geeky Gadgets may earn an affiliate commission. Learn about our Disclosure Policy.