Imagine this: it’s Monday morning, and your team’s work schedule has already updated itself to reflect last-minute changes—no frantic emails, no scribbled edits, no wasted time. Sounds like a dream, right? For many, managing schedules is a tedious, manual process prone to errors and inefficiencies. But what if you could create a system that not only organizes your team’s workload but also adjusts automatically as plans evolve? With Excel’s powerful tools, you can design a self-updating work schedule that transforms how you manage time and resources. This isn’t just about convenience—it’s about reclaiming hours of your day and making sure nothing slips through the cracks.
In this step-by-step exploration, the My Online Training Hub explains how to harness Excel’s dynamic features—like formulas, conditional formatting, and data validation—to build a schedule that adapts to your team’s needs. From automating date generation to color-coding work statuses for instant clarity, each step is designed to make your schedule both functional and visually intuitive. You’ll also discover how to integrate dropdown menus, calculate hours automatically, and even add summary metrics to track productivity at a glance. By the end, you’ll have more than just a schedule—you’ll have a customized, time-saving tool that evolves with your workflow. Because when it comes to managing your team, why settle for static when you can create something dynamic?
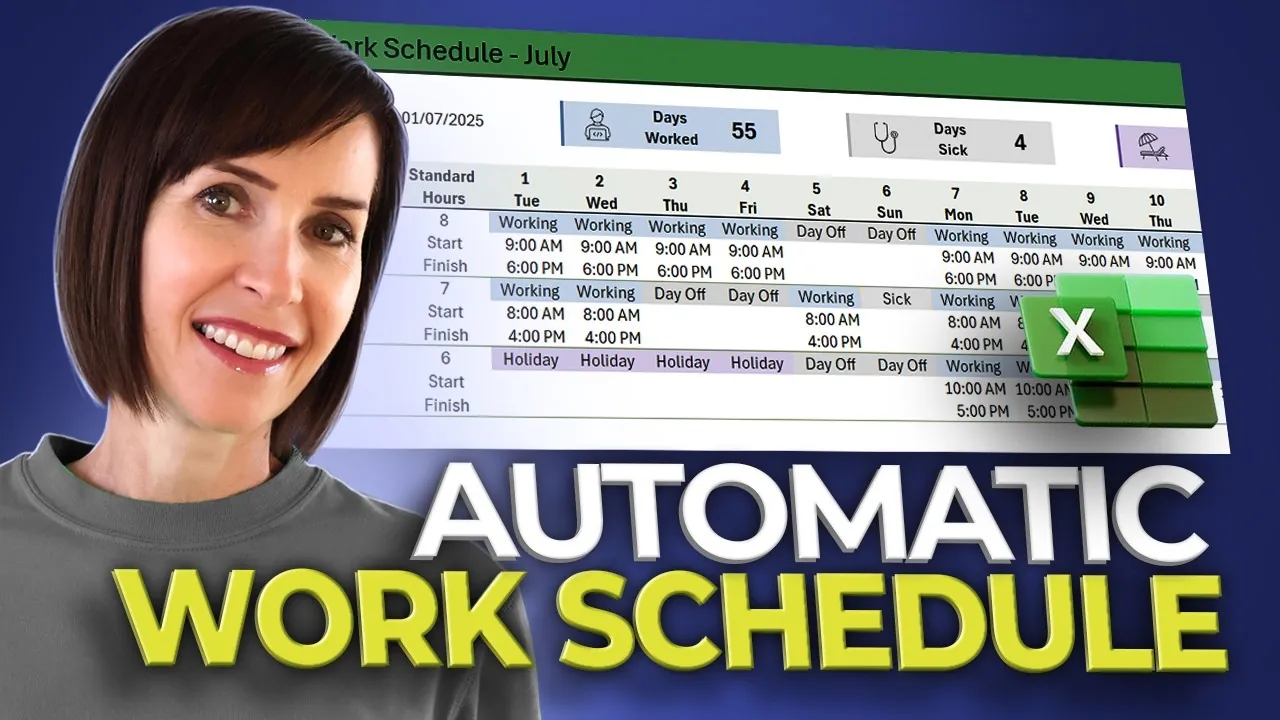
Self-Updating Excel Schedule
TL;DR Key Takeaways :
- Automate date generation using Excel functions like
SEQUENCEandEOMONTHto create dynamic schedules that adjust to varying month lengths. - Organize employee data with structured rows for work status, start time, and finish time, and use features like Freeze Panes for better navigation.
- Implement dropdown menus via data validation for consistent work status entries and apply conditional formatting for visual clarity with color-coded statuses.
- Automate calculations for finish times and include dynamic titles and summary metrics (e.g., total days worked, sick days) for quick insights into team performance.
- Enhance usability with improved visual design, expandable structures for new employees, and advanced Excel features like pivot tables and macros for added functionality.
Step 1: Automate Date Generation
The foundation of your schedule begins with automating the generation of dates. Use Excel’s `SEQUENCE` function to populate a column with dates for an entire month. To account for months with varying lengths, combine this with the `EOMONTH` function. For example, the formula `=SEQUENCE(EOMONTH(TODAY(),0)-TODAY()+1,1,TODAY())` can generate a list of dates starting from today until the end of the current month.
To enhance readability, format the dates to display both the day number and the abbreviated day name (e.g., “Mon” or “Tue”). This ensures that your schedule is not only accurate but also easy to interpret at a glance.
Step 2: Structure Employee Data
Organizing employee data is essential for a clear and functional schedule. Allocate three rows for each employee to track:
- Their work status (e.g., “Working,” “Day Off”).
- Their start time.
- Their finish time.
Record each employee’s standard working hours to simplify calculations later. To improve navigation, use the `Freeze Panes` feature to lock employee names in place, making sure they remain visible as you scroll through the schedule.
Microsoft Excel Self-Updating Work Schedule

Enhance your knowledge on Excel functions by exploring a selection of articles and guides on the subject.
- 10 New Excel Functions to improve your formulas
- How to Use Modern Excel Functions Like XLOOKUP & TEXTJOIN
- Top 15 Excel Functions to Improve Productivity and Efficiency
- Top Excel Functions You Need to Know According to Harvard
- Essential Excel Functions to Clean & Organize Data
- Master Advanced Excel Functions BYROW vs MAP vs SCAN vs
- Top Excel Formulas for Speed & Performance in Large Worksheets
- How to Use Excel Functions for Dynamic Reports and Dashboards
- Master Dynamic Excel Formulas with Dot Operator in 2025
- 10 MS Excel formulas to create next level spreadsheets
Step 3: Create Dropdown Menus for Work Status
Dropdown menus are a simple yet effective way to maintain consistency and reduce errors. Use Excel’s data validation feature to create dropdown lists for work statuses. Common options include:
- “Working”
- “Day Off”
- “Sick”
- “Holiday”
These menus allow for quick updates and ensure uniformity across all entries, making the schedule easier to manage and interpret.
Step 4: Apply Conditional Formatting
Conditional formatting enhances the visual clarity of your schedule by assigning specific colors to different work statuses. For example:
- Blue for “Working”
- Gray for “Day Off”
- Red for “Sick”
- Green for “Holiday”
This color-coding system allows you to quickly identify patterns, gaps, or potential scheduling conflicts, making it easier to manage your team’s workload.
Step 5: Automate Finish Time Calculations
Automating finish time calculations reduces manual input and minimizes errors. Use formulas such as `IF` and `AND` to calculate finish times based on start times and standard working hours. For instance, a formula like `=IF(A2=”Working”, A3+TIME(8,0,0), “”)` can calculate an 8-hour shift for employees marked as “Working,” while leaving days off or holidays blank. This ensures accuracy and saves time when updating schedules.
Step 6: Add Dynamic Titles and Summary Metrics
A dynamic title that updates automatically based on the selected month adds a professional touch to your schedule. Use formulas like `TEXT` to extract the month name from your date range, such as `=TEXT(TODAY(),”mmmm yyyy”)`. This ensures the title reflects the current scheduling period.
Additionally, include summary metrics to provide quick insights into team productivity. Use the `COUNTIF` function to calculate key figures, such as:
- Total days worked by all employees.
- Number of sick days taken.
- Days off or holidays scheduled.
These metrics offer a snapshot of team performance and help identify trends or areas for improvement.
Step 7: Improve Visual Design
A well-designed layout enhances usability and ensures the schedule is easy to navigate. Consider the following design improvements:
- Remove gridlines for a cleaner appearance.
- Add dividing lines to separate sections and improve organization.
- Use a consistent color scheme and icons to make the schedule visually appealing.
These adjustments not only improve the overall look of your schedule but also make it more user-friendly for anyone accessing it.
Step 8: Expand and Customize
Flexibility is key to maintaining a relevant and functional schedule. To add new employees, simply copy and modify existing rows. Update dropdown menus and formulas as needed to accommodate new roles or statuses. This expandable structure ensures your schedule can adapt to changes, whether your team grows or shifts responsibilities.
Additionally, consider integrating advanced Excel features, such as pivot tables or macros, to further enhance functionality. These tools can automate repetitive tasks and provide deeper insights into scheduling data.
By following these steps, you can create a self-updating work schedule in Excel that is both efficient and adaptable. From automated date generation to dynamic titles and visual enhancements, this approach simplifies scheduling while maintaining accuracy. Whether managing a small team or a large workforce, this method ensures your schedule evolves seamlessly with your needs.
Media Credit: MyOnlineTrainingHub
Disclosure: Some of our articles include affiliate links. If you buy something through one of these links, Geeky Gadgets may earn an affiliate commission. Learn about our Disclosure Policy.