What if you could take a simple 2D image—a sketch, a logo, or even a photograph—and transform it into a fully realized 3D model, ready for 3D printing or digital design? For years, this process required specialized skills, expensive software, and hours of manual work. But now, with the arrival of PartCrafter, the game has changed. This innovative tool doesn’t just convert 2D images into 3D models; it breaks them down into up to 16 distinct parts, making customization and assembly easier than ever. Whether you’re a hobbyist dreaming of your next 3D-printed masterpiece or a professional looking to streamline your workflow, PartCrafter promises to unlock creative possibilities you never thought possible.
In thew video below Olivio Sarikas takes you through setting up PartCrafter locally, empowering you to harness its full potential without relying on cloud services. Along the way, you’ll discover how features like background removal and color-coded part separation can simplify even the most complex projects. Whether you’re a beginner or a seasoned designer, this guide—crafted by Olivio Sarikas—will help you navigate the tool’s capabilities and avoid common pitfalls. By the end, you’ll not only have PartCrafter up and running but also a clear understanding of how to make it work for your unique creative needs. Let’s explore how this tool can redefine the way you approach 3D modeling.
Convert 2D Images to 3D Models
TL;DR Key Takeaways :
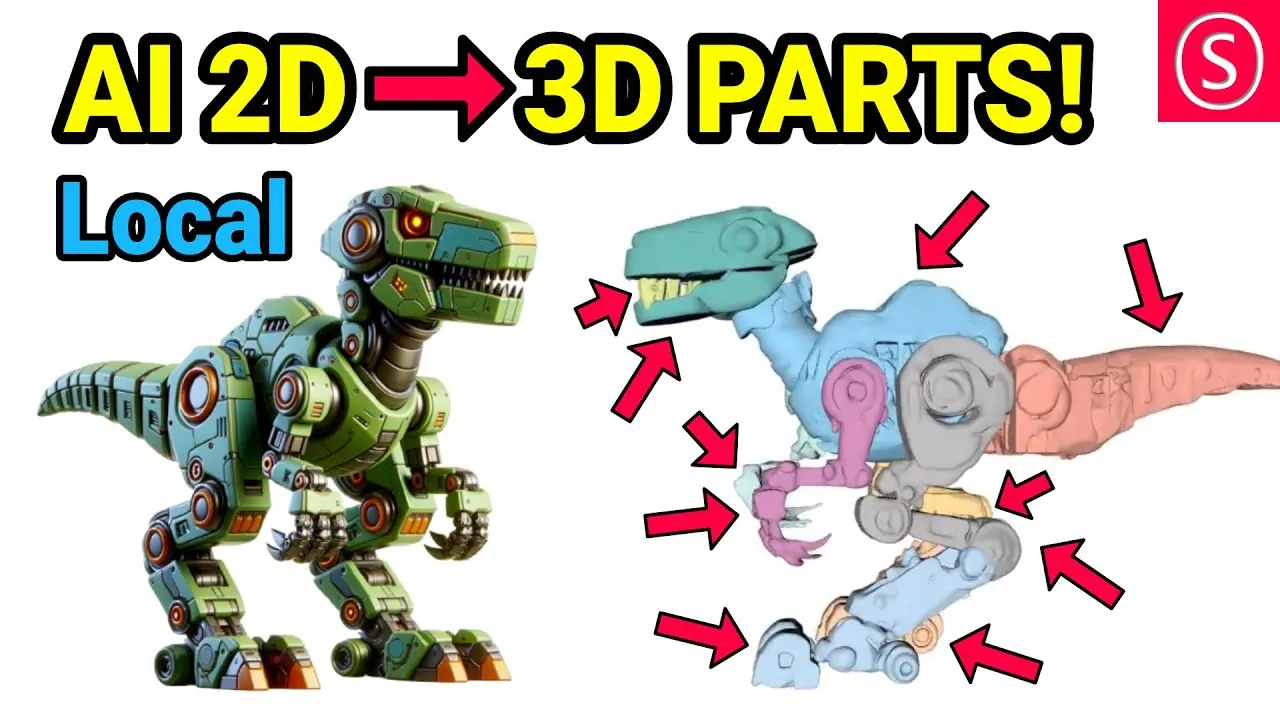
- PartCrafter is an advanced tool that converts 2D images into detailed 3D models with up to 16 distinct parts, streamlining workflows for designers, hobbyists, and professionals.
- Key features include segmentation for easier customization, automatic background removal for cleaner outputs, and color-coded part separation for enhanced clarity during post-processing.
- Users can set up PartCrafter via three methods: the user-friendly Hugging Face platform, the cloud-based Google Colab environment, or a local installation for maximum control.
- Best practices, such as using neutral backgrounds, incorporating color-specific prompts, and allowing background removal, can improve model quality and reduce post-processing time.
- PartCrafter has versatile applications across industries, including 3D printing, software integration (e.g., Blender), and rapid prototyping, making it a valuable tool for innovation and creativity.
Key Features That Set PartCrafter Apart
PartCrafter simplifies the traditionally challenging process of transforming 2D images into 3D models. Through advanced algorithms, it generates segmented 3D models that are ready for post-processing tasks such as 3D printing or integration into design software like Blender. Its standout features include:
- Segmentation: The tool divides models into distinct parts, making customization, assembly, and editing more efficient.
- Background Removal: Automatically eliminates unnecessary elements from the input image, making sure cleaner and more precise outputs.
- Color-Coded Part Separation: Assigns unique colors to different parts of the model, enhancing clarity and precision during post-processing.
These features make PartCrafter an essential tool for anyone aiming to simplify and enhance their 3D modeling workflow, whether for professional projects or personal creative endeavors.
Setting Up PartCrafter: Options for Every User
PartCrafter offers three distinct setup methods, catering to users with varying levels of technical expertise and resource availability. Each method provides unique advantages, allowing you to choose the one that best suits your needs:
- Hugging Face Platform: This is the most user-friendly option, requiring no installation. By accessing PartCrafter directly on the Hugging Face platform, you can start creating models immediately. Free credits are available for initial use, with the option to purchase additional credits as needed. This setup is ideal for beginners or those seeking quick results without technical complexity.
- Google Colab Environment: For users who prefer a cloud-based solution with more control, Google Colab offers a practical alternative. To use this method, copy the project to your Google Drive, set the runtime to a T4 GPU, and follow the provided installation steps. While this option provides GPU acceleration for faster processing, achieving optimal results may require multiple iterations.
- Local Installation (Windows/Linux): This method is best suited for advanced users seeking maximum control over the tool. It involves downloading the project, setting up a virtual environment, and managing dependencies such as Torch and DeepSpeed. Linux users often experience smoother installations, while Windows users may need to address compatibility issues and command-line errors.
Each setup method is designed to accommodate different levels of expertise, making sure that PartCrafter is accessible to a wide range of users.
How to Create 3D Models from Photos and Sketches Using PartCrafter

Enhance your knowledge on 2D to 3D Conversion by exploring a selection of articles and guides on the subject.
- LG Optimus 3D Gets Updated With 3D Game Conversion
- Convert 2D Images into 3D Models for Free with Trellis AI
- Convert 2D images into 3D models you can use in Blender
- AI 3D models from text prompts – How close are we?
- 10 Mind-Blowing Free AI Animation Tools You Need in 2024
- How to create laser engraving depth maps from AI generated
- Blender open source 3D modeling tool to receive VR support via
- HoloMat Holographic Sci-Fi Workbench : Engineer Like Tony Stark
Maximizing Results with Best Practices
To achieve the best possible outcomes with PartCrafter, consider implementing the following best practices:
- Use Neutral Backgrounds: Input images with plain or neutral backgrounds improve the accuracy of part separation and segmentation.
- Incorporate Color-Specific Prompts: Adding color prompts to your input images enhances the clarity and precision of individual parts in the final model.
- Enable Background Removal: Activating this feature ensures that unnecessary elements are excluded, resulting in cleaner and more refined models.
By following these tips, you can enhance the quality of your 3D models and reduce the need for extensive post-processing, saving time and effort.
PartCrafter Overview

Addressing Common Challenges
While PartCrafter is a powerful and versatile tool, users may encounter certain challenges, particularly during local installation. Common issues include:
- Dependency Conflicts: Making sure compatibility between software versions and resolving conflicts during installation can be time-consuming.
- Virtual Environment Management: Navigating user folders and setting up virtual environments may require additional technical knowledge.
- Command-Line Errors: Windows users, in particular, may face challenges with command-line operations and troubleshooting errors.
To overcome these challenges, consider using community support platforms such as Discord. Engaging with other users allows you to share insights, ask questions, and find collaborative solutions to technical issues.
Applications Across Industries
PartCrafter’s versatility makes it a valuable tool across a wide range of industries and creative fields. Its ability to bridge the gap between 2D imagery and 3D modeling opens up numerous possibilities, including:
- 3D Printing: The tool’s segmentation capabilities simplify the creation of complex, multi-part objects, making it easier to produce high-quality 3D prints.
- Software Integration: Models generated with PartCrafter can be seamlessly imported into design programs like Blender for further refinement and customization.
- Prototyping and Design: Quickly transform 2D sketches or images into 3D prototypes, accelerating the design and iteration process for various projects.
These applications highlight the tool’s potential to enhance workflows and drive innovation in fields ranging from product design to digital art.
Unlocking the Full Potential of PartCrafter
PartCrafter offers a robust and efficient solution for converting 2D images into detailed 3D models, catering to users with diverse technical skills and project requirements. Whether you opt for the simplicity of the Hugging Face platform, the flexibility of Google Colab, or the control of local installation, this tool equips you with the resources needed to bring your creative visions to life. By using its advanced features and adhering to best practices, you can streamline your workflow and achieve exceptional results across a variety of 3D applications.
Media Credit: Olivio Sarikas
Disclosure: Some of our articles include affiliate links. If you buy something through one of these links, Geeky Gadgets may earn an affiliate commission. Learn about our Disclosure Policy.