Have you ever wondered how to transform a basic server into a powerhouse of virtualization and efficiency? Whether you’re building a sleek home lab or managing enterprise-grade workloads, Proxmox Virtual Environment (VE) offers the tools to make it happen. This open source platform, built on the rock-solid foundation of Debian Linux, combines simplicity with advanced features like ZFS storage, GPU passthrough, and containerized environments. But here’s the catch: while Proxmox is incredibly versatile, unlocking its full potential requires more than just a default installation. That’s where this comprehensive quick-start guide comes in. From post-installation tweaks to mastering hardware optimizations, we’ll help you turn your Proxmox setup into a finely tuned machine.
In this guide, created by NetBird, you’ll discover how to configure ZFS for unparalleled data protection, enable GPU passthrough for resource-intensive tasks, and set up seamless remote access using tools like Netbird. We’ll also explore best practices for managing virtual machines (VMs) and containers, making sure your system runs efficiently and securely. Whether you’re a virtualization novice or a seasoned IT professional, this guide is packed with actionable insights to elevate your Proxmox experience. Ready to uncover the strategies that will take your virtualization game to the next level? Let’s explore the possibilities together.
Proxmox VE Overview
TL;DR Key Takeaways :
- Proxmox Virtual Environment (VE) is an open source platform built on Debian Linux, offering a web-based interface for managing virtual machines (VMs) and containers, suitable for both home labs and enterprise-grade virtualization.
- Proper hardware planning is crucial, with recommendations including ZFS storage pools for redundancy, GPUs for resource-intensive tasks, and sufficient RAM for handling multiple VMs or containers.
- Post-installation steps include updating the system, configuring storage (preferably ZFS), allowing IOMMU for hardware passthrough, and setting up regular backups for data protection.
- Proxmox supports both LXC containers for lightweight tasks and full VMs for complete OS environments, with features like GPU passthrough allowing advanced workloads such as gaming or AI processing.
- Networking is simplified with options like bridges, VLANs, and bonds, while the web-based management interface provides centralized control for monitoring, backups, and updates.
Hardware Considerations
Before installing Proxmox, it is essential to ensure your hardware meets the necessary requirements. Proxmox supports x86-based platforms with Intel or AMD processors that include virtualization extensions like Intel VT-x or AMD-V. For advanced features such as GPU passthrough, allowing IOMMU in your BIOS settings is critical.
When selecting hardware, consider your specific needs and workloads. Key factors include:
- Storage: ZFS storage pools are highly recommended for their redundancy, scalability, and performance benefits.
- GPUs: These are essential for tasks like media transcoding, gaming, or AI workloads, making them a valuable addition for certain setups.
- Memory: Ensure sufficient RAM to handle the number of VMs or containers you plan to run simultaneously.
Proper hardware planning ensures a smooth installation process and optimal performance for your Proxmox environment.
Installing Proxmox VE
To begin, download the Proxmox ISO from the official website and create a bootable USB drive. During installation, verify that virtualization and secure boot are enabled in your BIOS settings. Proxmox also allows you to configure ZFS pools during installation, which is recommended for enhanced data redundancy and performance.
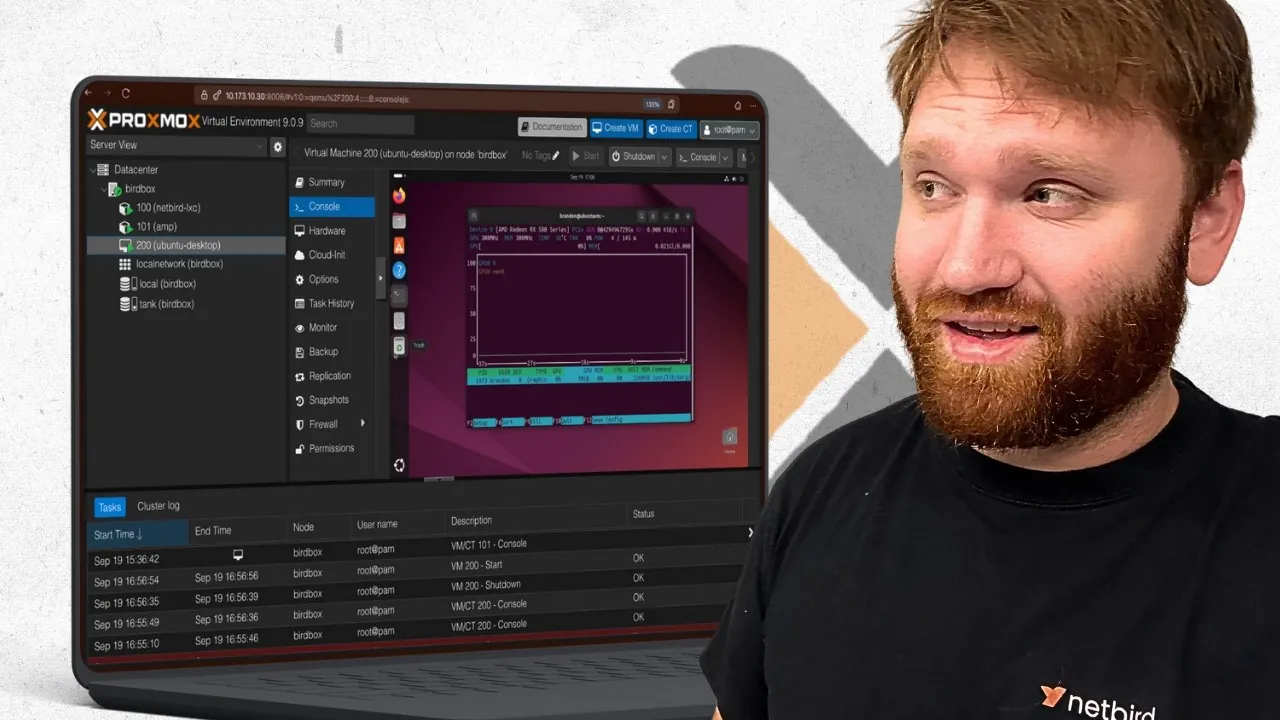
Once the installation is complete, access the web-based interface using your server’s IP address. This interface serves as the central hub for configuring and managing your Proxmox environment. From here, you can create VMs, set up containers, and manage storage and networking.
Proxmox Guide 2025

Gain further expertise in Proxmox by checking out these recommendations.
- Installing Proxmox 8.1 virtualization platform on a Raspberry Pi 5
- Proxmox Backup Server : Features, Benefits, and Why It’s a Must
- Ultimate Home Server Setup with Proxmox, ZFS and Containers
- xPipe Open-Source Tool for Managing Remote Connections
- Aoostar WTR PRO Versatile and Efficient Home Lab Server
- Noctua NH-P1 fanless hackintosh
- How to set up a laptop as a home server
- Add a Raspberry Pi 5 SSD NVMe storage with ease
- Raspberry Pi 5 M.2 SSD HAT+ PCIe Gen 3 board launches for $9
- tvOS 16 beta 5 released to developers
Post-Installation Configuration
After installing Proxmox, several key steps are necessary to optimize your setup and ensure a secure, efficient environment:
- Update the system: Update Proxmox repositories and install the latest system packages to access new features and security patches.
- Configure storage: Choose between Logical Volume Management (LVM) or single partitions based on your storage needs. ZFS is often preferred for its advanced features.
- Enable IOMMU: Activate IOMMU in your system settings to enable PCI passthrough for advanced hardware integration, such as GPU or network card passthrough.
- Set up backups: Configure regular backups to protect your data and ensure quick recovery in case of system failures.
These steps lay the foundation for a stable and efficient Proxmox environment.
Optimizing Storage with ZFS
ZFS is a robust file system that combines performance, scalability, and data protection, making it an excellent choice for virtualized environments. Its features include snapshots, compression, and advanced RAID configurations. To maximize the benefits of ZFS:
- Create a ZFS pool with RAID-Z1 or RAID-Z2 for a balance of redundancy and performance.
- Use snapshots to quickly roll back changes or recover data in case of errors or failures.
- Enable compression to save storage space without compromising performance.
By using ZFS, you can enhance the reliability and efficiency of your Proxmox storage infrastructure.
Managing Containers and Virtual Machines
Proxmox supports both lightweight LXC containers and full virtual machines, each serving distinct purposes. Containers are ideal for running isolated applications or services, while VMs provide complete operating system environments. Key considerations include:
- Containers: Use containers for specific tasks like hosting a Netbird instance for secure remote access or running lightweight services.
- Virtual Machines: Deploy VMs for running full operating systems such as Windows or Ubuntu, especially when complete isolation is required.
- Resource allocation: Assign CPU, RAM, and storage resources based on the workload requirements of each container or VM.
For better integration and performance, install the QEMU guest agent within your VMs to enable advanced features like live migration and improved resource management.
GPU Passthrough Configuration
GPU passthrough allows you to assign a physical GPU to a VM, allowing tasks such as gaming, AI processing, or video rendering. To configure GPU passthrough:
- Blacklist the GPU drivers in Proxmox to prevent conflicts with the host system.
- Enable passthrough in the VM settings and assign the GPU to the desired VM.
- Verify the GPU’s functionality within the VM to ensure proper configuration and performance.
This feature unlocks powerful capabilities for resource-intensive workloads, making Proxmox a versatile platform for advanced use cases.
Remote Access with Netbird
Netbird is a secure remote access tool that can be deployed in a Proxmox container. It allows you to connect to your Proxmox server and local network resources from anywhere. Key features of Netbird include:
- Policy configuration: Define access controls to ensure secure and restricted connections.
- Subnet routing: Enhance connectivity by allowing seamless access to multiple network segments.
By integrating Netbird, you can manage your Proxmox environment remotely, making sure flexibility and convenience.
Networking and Web-Based Management
Proxmox simplifies networking with its intuitive interface, allowing you to configure complex setups with ease. Networking options include:
- Bridges: Connect VMs and containers to your physical network for seamless communication.
- VLANs: Segment network traffic to improve security and manageability.
- Bonds: Combine multiple network interfaces for redundancy or increased bandwidth.
The web-based management interface provides a centralized view of your environment, allowing you to monitor resources, manage backups, and deploy updates efficiently.
Best Practices and Use Cases
Proxmox is a versatile platform that caters to a wide range of scenarios. Some practical use cases include:
- Home Labs: Experiment with Linux, networking, or virtualization in a controlled environment.
- Media Servers: Use GPU passthrough for efficient media transcoding and streaming.
- Development Environments: Create isolated VMs and containers for testing and development purposes.
- Enterprise Workloads: Manage production-grade virtualization with advanced features like clustering and high availability.
To maintain a stable and secure setup, regularly update your system, monitor resource usage, and back up critical data. Proxmox’s flexibility and robust feature set make it an excellent choice for both beginners and advanced users.
Media Credit: NetBird
Disclosure: Some of our articles include affiliate links. If you buy something through one of these links, Geeky Gadgets may earn an affiliate commission. Learn about our Disclosure Policy.