Have you ever looked at an old MacBook gathering dust on a shelf and wondered if it could still serve a purpose? While it might seem like yesterday’s tech, that aging device is far from obsolete. In fact, it could be the backbone of your digital life. With just a bit of ingenuity, you can transform your unused MacBook into a versatile DIY home server—a hub for wireless backups, personal cloud storage, and even media streaming. Why let such capable hardware go to waste when it can become the unsung hero of your home setup?
In this guide, Matthew Piccolo explains how to breathe new life into your old MacBook and unlock its hidden potential. You’ll discover the tools and techniques needed to convert it into a powerful, always-on server that simplifies your digital world. From setting up seamless file sharing to organizing your workspace for efficiency, this guide will show you how to turn aging tech into a modern solution. By the end, you might just see that forgotten MacBook in a whole new light, not as outdated hardware, but as an indispensable ally for your home.
Turn Old MacBook into NAS Servers
TL;DR Key Takeaways :
- Repurposing an old MacBook, like a 2015 13-inch MacBook Pro, into a DIY home server is an eco-friendly way to extend its usefulness for tasks like backups, cloud storage, and media streaming.
- A DIY home server can enable wireless Time Machine backups, act as a personal cloud (NAS), and support media streaming via software like Plex Media Server.
- Essential tools for setup include RustDesk for remote management, AlDente for battery optimization, and a display emulator dongle for headless operation.
- Hardware setup involves using a two-bay hard drive enclosure with RAID configuration, allowing macOS file sharing, and organizing the workspace with custom mounts for a tidy setup.
- Maintaining security and performance requires antivirus software, regular updates, and remote management tools to ensure reliable and efficient operation over time.
Why Repurpose an Old MacBook?
An unused MacBook sitting idle can be turned into a valuable asset by converting it into a home server. These devices, even when outdated, are still capable of performing essential tasks such as file storage, media streaming, and backups. By repurposing your MacBook, you can centralize your data, streamline access across multiple devices, and reduce electronic waste. This approach not only maximizes the utility of your existing hardware but also contributes to a more sustainable use of technology.
What Can a DIY Home Server Do?
A repurposed MacBook can serve as a versatile and efficient hub for managing your digital needs. Here are some of the key functionalities you can enable:
- Wireless Time Machine Backups: Your MacBook can act as a destination for automatic, wireless backups, making sure your data is consistently protected without requiring physical connections.
- Network-Attached Storage (NAS): Transform the device into a personal cloud, allowing you to store and access files remotely from any device connected to your network.
- Media Streaming: Install software like Plex Media Server to organize and stream your legally owned movies, music, and photos to devices such as smart TVs, tablets, and smartphones.
These features make a DIY home server a practical solution for managing and accessing your digital content efficiently.
An Obsolete Mac is Your Greatest Ally : DIY Homeserver Guide 2025

Stay informed about the latest in MacBook news by exploring our other resources and articles.
- Apple’s Budget MacBook: Features, Pricing, and Release Date
- Affordable MacBook Mini: Apple’s Entry-Level Laptop Details
- Affordable MacBook 2026: Price, Features, and Why It’s Perfect
- Apple’s $599 MacBook: Everything You Need to Know
- Apple’s Budget MacBook: Everything You Need to Know
- M5 MacBook Air 2026: Release Date, Specs, and Features
- Apple MacBook SE: Specs, Pricing, and More
- How to Optimize Your M4 MacBook Air for Maximum Performance
- M4 MacBook Air setup guide for optimizing performance
- MacBook Air M5 Features and Upgrades Explained
Essential Software and Tools
To unlock the full potential of your home server, you’ll need specific software and tools that enhance its functionality and ensure smooth operation. Here are the essentials:
- RustDesk: A remote desktop application that allows you to manage your server from anywhere, eliminating the need for physical access to the MacBook.
- AlDente: A battery management tool that caps the charge level of your MacBook, helping to prolong its battery life and maintain efficiency during continuous use.
- Display Emulator Dongle: This small device tricks the MacBook into thinking a monitor is connected, allowing seamless performance in headless (monitor-free) operation.
These tools are critical for making sure your server operates efficiently and remains easy to manage.
Setting Up Hardware and Storage
A well-organized hardware setup is essential for creating a functional and tidy home server. Follow these steps to get started:
- Storage: Use a two-bay hard drive enclosure with reliable drives, such as Seagate models. Configure the drives in a RAID setup for redundancy (data protection) or performance, depending on your specific needs.
- File Sharing: Enable macOS file sharing to allow seamless access to your storage and backups across all your devices.
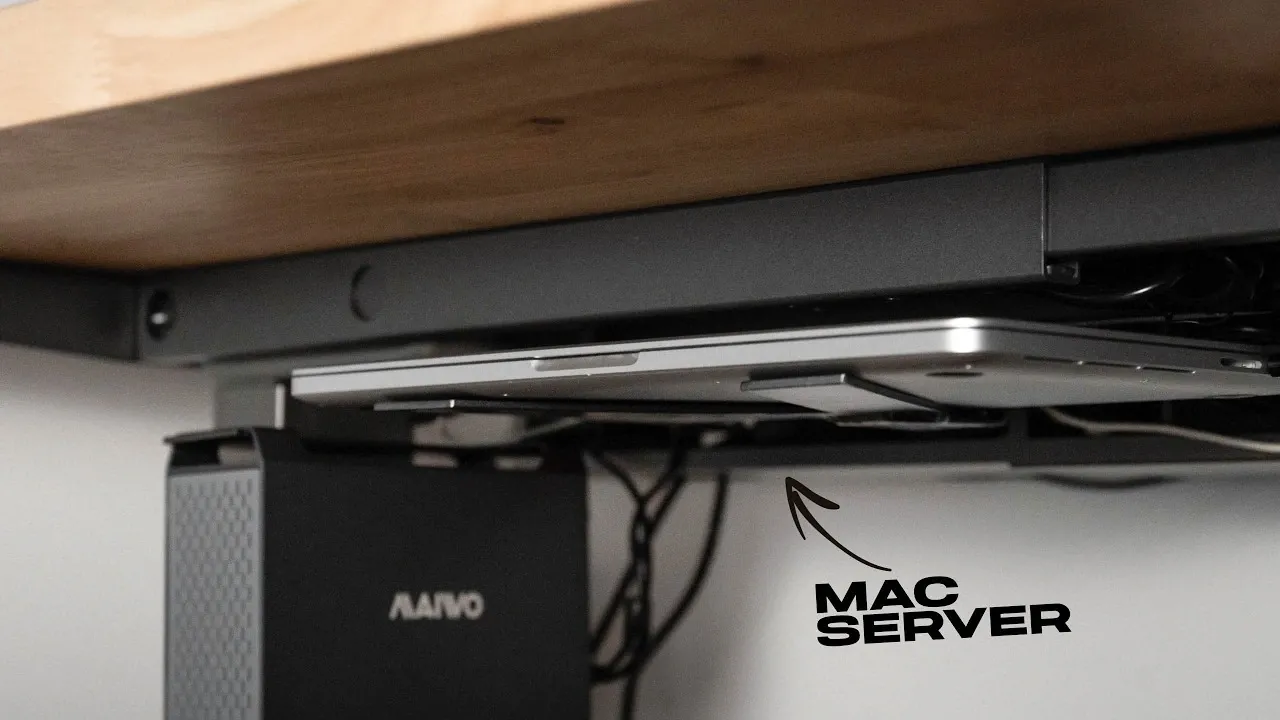
- Workspace Organization: Consider fabricating a custom steel mount to secure your MacBook and hard drive enclosure under a desk. Painting and assembling the mount ensures it blends with your home setup while keeping cables and devices neatly organized and out of sight.
This setup not only optimizes the functionality of your server but also ensures it integrates seamlessly into your workspace.
Maintaining Security and Performance
An always-on server requires consistent attention to security and maintenance to ensure it operates efficiently and remains protected. Here are some key steps to follow:
- Antivirus Software: Install reliable antivirus tools to safeguard your data and prevent unauthorized access to your server.
- Regular Updates: Keep your macOS and server software up to date to patch vulnerabilities and improve overall performance.
- Remote Management: Use RustDesk to troubleshoot and manage your server remotely, minimizing downtime and making sure smooth operation.
By prioritizing security and performance, you can maintain a reliable and efficient home server for long-term use.
Considering Alternatives
While an old MacBook is an excellent choice for a DIY home server, other devices may better suit your needs depending on your specific requirements. For example, a Mac Mini offers a compact design, energy efficiency, and similar capabilities, making it a strong alternative. Regardless of the device you choose, ensure proper cooling and power management to maintain optimal performance over time.
Repurposing an old MacBook into a DIY home server is a practical and eco-friendly way to extend the life of outdated technology. By following this guide, you can create a powerful tool for managing your digital life, offering wireless backups, personal cloud storage, and media streaming. This project not only reduces electronic waste but also demonstrates how aging devices can still deliver significant value when repurposed thoughtfully.
Media Credit: Matthew Piccolo
Disclosure: Some of our articles include affiliate links. If you buy something through one of these links, Geeky Gadgets may earn an affiliate commission. Learn about our Disclosure Policy.