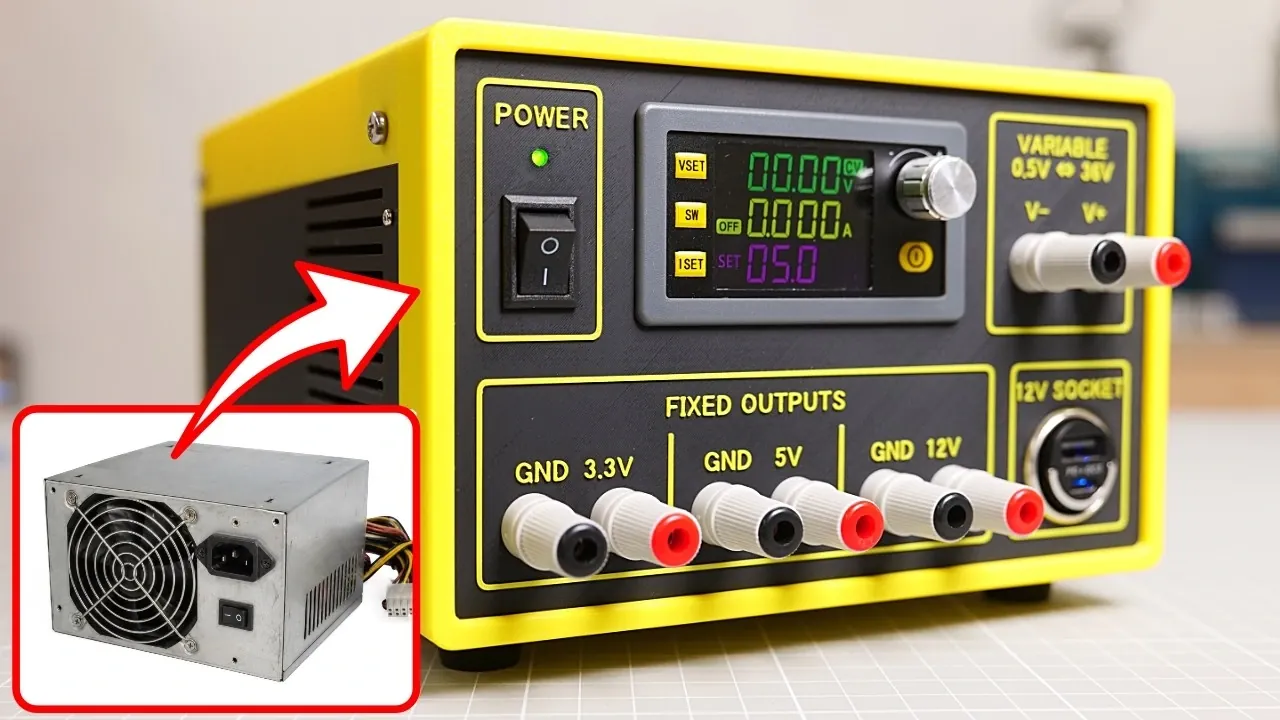
Old computers often contain components that can be repurposed for practical applications. According to JSK-Studio, one example is converting an ATX power supply from an outdated desktop into a bench power supply. These units provide fixed voltage outputs such as 3.3V, 5V and 12V, which are useful for powering small electronics projects. The process includes steps like reorganizing the wiring, adding output terminals and incorporating safety measures such as capacitor discharge and fuse installation to reduce electrical risks.
Discover how to modify an old power supply for workspace use. Learn about integrating features like a buck-boost converter for adjustable voltage, a 12V cigarette lighter socket for automotive devices and custom 3D-printed panels for better functionality. Gain insight into testing methods to confirm performance and maintain safety throughout the project.
Why Repurpose an ATX Power Supply?
TL;DR Key Takeaways :
- Repurposing an old ATX power supply into a bench power supply is a cost-effective and sustainable project, offering multiple voltage outputs (3.3V, 5V, 12V) for powering various electronics projects.
- Safety is critical when handling high-voltage components; discharge capacitors properly, use fuses to prevent overcurrent and maintain a safe workspace to minimize risks.
- Organizing wiring with cable ties, heat shrink tubing and terminal blocks ensures a neat layout, stable operation and easy troubleshooting, while clear labeling prevents errors during use.
- Customizing the power supply with 3D-printed components, such as front panels for banana sockets and LED indicators, enhances functionality and provides a professional appearance.
- Optional features like buck-boost converters, LED indicators and 12V cigarette lighter sockets expand the power supply’s versatility, making it suitable for a wide range of applications.
ATX power supplies, commonly found in desktop computers, are excellent candidates for conversion due to their multiple voltage outputs. These units typically provide 3.3V, 5V, 12V and sometimes variable voltage, making them highly versatile for a wide range of electronics projects. By reorganizing the wiring and adding accessible output terminals, you can convert this component into a powerful and adaptable tool for your workspace.
To further enhance its functionality, consider integrating additional features such as a buck-boost converter, which allows you to adjust voltage and current. This flexibility is invaluable for powering devices with varying requirements. Another useful addition is a 12V cigarette lighter socket, allowing compatibility with automotive accessories. These enhancements not only expand the power supply’s capabilities but also make it a more practical and efficient tool for diverse applications.
Safety First: Handling High Voltage
Working with power supplies involves inherent risks, so prioritizing safety is essential. ATX power supplies contain high-voltage capacitors that can retain dangerous charges even after being unplugged. To safely discharge these capacitors, use a resistor or a dedicated discharge tool. This step is critical to avoid accidental shocks during the modification process.
Additionally, install fuses to protect the wiring and output terminals from overcurrent conditions. Fuses act as a safeguard, reducing the risk of damage to your components or potential fire hazards. Always ensure that your workspace is well-ventilated and free from flammable materials when working with electrical components. By taking these precautions, you can confidently proceed with the project while minimizing risks.

Browse through more resources below from our in-depth content covering more areas on hardware DIY projects.
- Don’t Wait for Valve: Build Your Own Steam Machine in 2026
- DIY Raspberry Pi Smart TV Set Top Box – Apple TV Alternative
- DIY 3D print recycler and filament maker : Artme3D MK2
- Building Your Own DIY Steam Machine is Easier Than You Think
- GeekCube DIY Steam Machine : Custom SFF SteamOS 3.8 Gaming Console
- DIY Motion Activated Wildlife Camera Arduino Project
- DIY Steam Machine : Why This Corsair Mini PC is the Ultimate Blueprint
- The Secret to Getting the Ultimate Steam Machine? Build It Yourself
- DIY Steam Machine Build : Skip the Mini PC, This Linux Steam Build Hits 1440p with Headroom
- Guide to Building Your Own Steam Machine : Zac Builds
Organizing Wiring and Grounding
Proper wiring organization is crucial for both safety and functionality. Begin by grouping wires based on their voltage output. Use cable ties or heat shrink tubing to secure these groups, making sure a neat and manageable layout. This step not only improves the aesthetic of your project but also simplifies troubleshooting and future modifications.
To establish a stable and reliable operation, use terminal blocks to create a common ground reference. This ensures consistent performance across all voltage outputs. Clearly label each output voltage to avoid confusion during operation. Proper labeling minimizes the risk of errors, especially when connecting sensitive devices that require specific voltage levels.
Customizing with 3D Printing
3D printing offers a practical and creative way to enhance the design and usability of your bench power supply. By designing a custom front panel, you can neatly house banana sockets, switches and LED indicators. This not only improves the functionality of your power supply but also gives it a polished and professional appearance.
In addition to the front panel, you can print structural components to reinforce the power supply’s casing. These components enhance durability while maintaining a compact and organized design. Customization through 3D printing allows you to tailor the power supply to your specific needs, making it a more efficient and user-friendly tool for your workspace.
Optional Features to Expand Functionality
To maximize the versatility of your bench power supply, consider incorporating additional features:
- A buck-boost converter for adjustable voltage and current limiting, allowing compatibility with a wider range of devices.
- LED indicators to display operational status and voltage levels, providing real-time feedback during use.
- A 12V cigarette lighter socket to power automotive devices or accessories.
These optional features significantly expand the range of applications for your power supply, making it a valuable and adaptable tool for various projects. Whether you’re powering microcontrollers, testing circuits, or running automotive accessories, these enhancements ensure your power supply meets diverse requirements.
Testing and Making sure Performance
After assembling your bench power supply, it is essential to thoroughly test its functionality. Begin by verifying that each voltage output operates correctly and delivers the expected voltage levels. Use a multimeter to check for accuracy and stability across all outputs.
Next, test the current-limiting feature to ensure it protects connected devices from overcurrent conditions. This is particularly important when powering sensitive electronics. Finally, use the power supply in practical applications, such as powering LEDs, microcontrollers, or experimental circuits. This hands-on testing phase confirms the reliability and performance of your creation, making sure it is ready for real-world use.
Why This Project is Worthwhile
Repurposing an old ATX power supply offers numerous benefits, making it a worthwhile project for hobbyists and engineers alike:
- It reduces reliance on multiple AC adapters, helping to declutter your workspace and simplify power management.
- It provides a cost-effective solution for powering electronics projects, saving money compared to purchasing a commercial bench power supply.
- It promotes sustainability by giving new life to discarded computer components, reducing electronic waste.
This project not only encourages creativity and problem-solving but also results in a functional and customizable tool that enhances your electronics workspace. By repurposing an old component, you contribute to a more sustainable approach to technology while gaining a valuable resource for your projects.
Media Credit: JSK-Studio
Disclosure: Some of our articles include affiliate links. If you buy something through one of these links, Geeky Gadgets may earn an affiliate commission. Learn about our Disclosure Policy.
