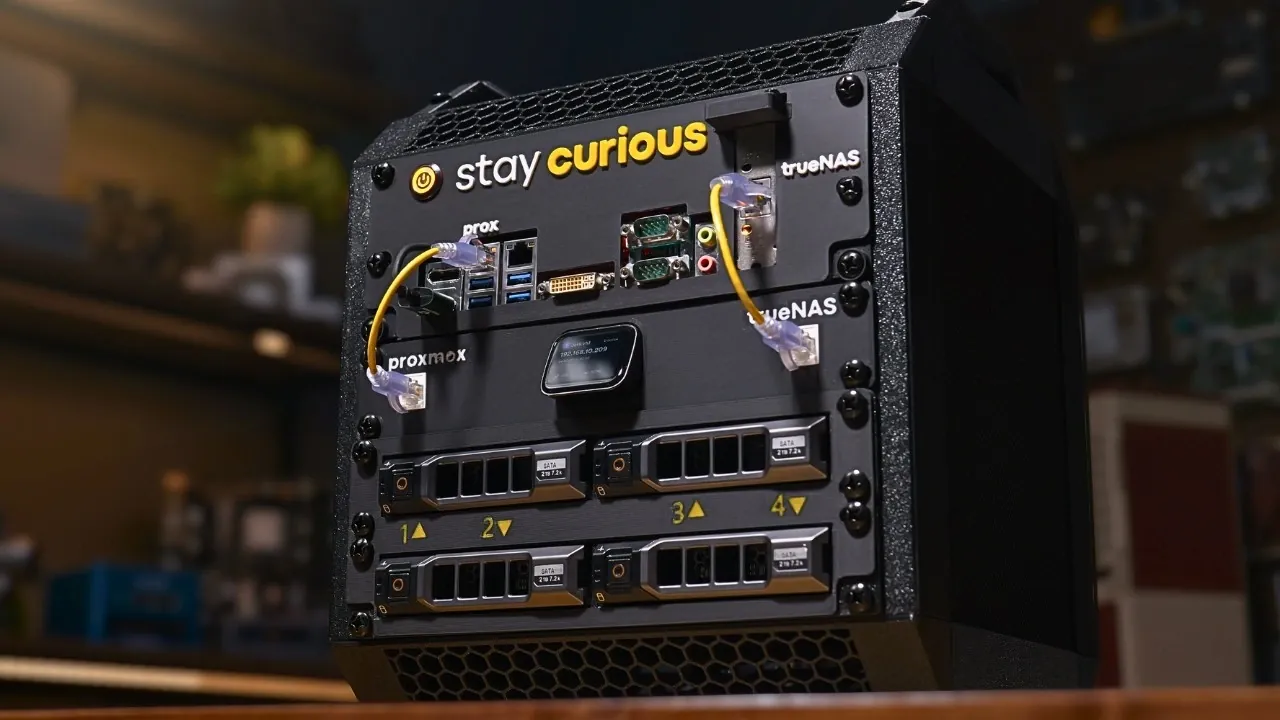
Building a DIY local backup server is an effective way to protect your data while maintaining full control over your storage setup. Below Hardware Haven, kindly takes you through one approach which involves using Proxmox and TrueNAS as the software backbone, paired with hardware like the SuperMicro X11SSV-Q Mini-ITX motherboard and mirrored 24TB Seagate Exos drives. This combination supports reliable backups, energy efficiency and additional features such as hosting virtual machines or managing network shares, all within a compact design.
Learn how to configure Proxmox Backup Server to enable deduplication and ensure data integrity. Gain insight into selecting energy-efficient hardware, including power supply considerations and custom cooling solutions. Additionally, understand how to navigate challenges like network configuration and virtualization limits to create a stable and functional backup system.
Why Build a Local Backup Server?
TL;DR Key Takeaways :
- This DIY local backup server project by Hardware Haven offers a scalable, energy-efficient solution for consolidating and securing data from multiple devices, emphasizing flexibility and adaptability.
- Key software components like Proxmox, Proxmox Backup Server (PBS), TrueNAS and NFS Shares ensure robust virtualization, efficient backups and advanced storage management.
- The hardware configuration, including a SuperMicro Mini-ITX motherboard, Intel i3-6100 CPU, 32GB RAM and mirrored 24TB drives, balances performance, energy efficiency and reliability.
- Custom 3D-printed components enhance the server’s design, improving space management, cooling efficiency and usability with features like hot-swappable drive bays.
- The server achieves low power consumption (30-40W idle, 60-70W peak), quiet operation and future scalability, making it ideal for home or small office environments.
A local backup server consolidates data from various devices into a single, secure and easily manageable location. Unlike bulky, power-intensive servers, this setup emphasizes compactness and energy efficiency. By using virtualization and modular hardware, you can scale the system to accommodate additional tasks, such as hosting virtual machines, managing network shares, or even running lightweight applications. This approach ensures that your system remains adaptable without compromising performance or flexibility.
Building your own backup server also provides greater control over your data. Instead of relying on third-party cloud services, you can maintain full ownership and security of your files. This is particularly beneficial for sensitive information or environments where data privacy is a top concern.
Key Software Components
The software stack is the backbone of this backup solution, making sure seamless operation, data integrity and efficient management. Each component plays a vital role in creating a robust and versatile system:
- Proxmox: A powerful hypervisor that enables the management of virtual machines and containers, providing a flexible virtualization platform.
- Proxmox Backup Server (PBS): Designed specifically for Proxmox environments, PBS ensures efficient backups with features like deduplication and data integrity verification.
- TrueNAS: Configured as a virtual machine, TrueNAS handles ZFS replication, network shares and iSCSI volumes, offering advanced storage management capabilities.
- NFS Shares: These are integrated to store PBS backups, creating a seamless connection between virtualized environments and physical storage devices.
This combination of software tools ensures that your backup server is not only reliable but also capable of handling diverse storage and backup needs with ease.

Deep dive into the latest in home lab tech by exploring our other resources and articles.
- Best Docker Apps for Homelabs: Take Control of Your Digital Life
- How to Build a Mini Rack for Your Home Lab
- How to Build a Low-Power, High-Performance Home Lab on a Budget
- How to Build a Compact Home Lab : Step-by-Step Guide 2025
- Build a Raspberry Pi Home Lab Without Breaking the Bank
- How to Easily Build a Home Server with Raspberry Pi 5
- How to Build the Perfect Homelab Setup
Hardware Configuration
The hardware setup is carefully designed to balance performance, energy efficiency and reliability. Here’s a breakdown of the components required for this project:
- Motherboard: The SuperMicro X11SSV-Q Mini-ITX board provides a compact yet powerful foundation for the server.
- Processor: An Intel i3-6100 CPU delivers sufficient processing power for virtualization and backup tasks.
- Memory: 32GB of DDR4 RAM ensures smooth multitasking and efficient operation of virtual machines.
- Storage:
- Two 24TB Seagate Exos drives configured in a mirrored setup for redundancy and data protection.
- Two 4TB Western Digital drives dedicated to Proxmox Backup Server storage.
- Power Supply: A Pico power supply paired with a 19V adapter minimizes energy consumption while maintaining reliable performance.
This hardware configuration is ideal for home or small office environments, offering a compact and energy-efficient solution without sacrificing functionality.
Custom 3D Printing for Optimization
To enhance the server’s design and functionality, custom 3D-printed components were utilized. These additions improve space management, cooling efficiency and overall usability:
- Custom drive mounts and a motherboard tray ensure efficient organization of internal components.
- Side panels with integrated fans provide optimal airflow, keeping temperatures within safe operating limits.
- Dell drive caddies enable hot-swappable drive bays, making maintenance and upgrades more convenient.
The 3D-printed rack not only optimizes the server’s physical layout but also adds a touch of personalization, making the setup both practical and visually appealing.
Overcoming Challenges
Building a DIY backup server comes with its own set of challenges. Addressing these issues is crucial to ensure a stable and reliable system:
- Hardware Failures: An initial motherboard failure required sourcing a replacement, which delayed progress but highlighted the importance of component reliability.
- Network Configuration: Fine-tuning VLAN settings was necessary to optimize communication between devices and ensure seamless data transfers.
- Virtualization Constraints: Running PBS in a virtualized environment required careful resource allocation and extensive testing to maintain stability and performance.
By tackling these challenges, the system was refined to deliver consistent and dependable performance.
Performance and Energy Efficiency
The completed server strikes a balance between performance and energy efficiency, making it suitable for a variety of use cases. Key performance metrics include:
- Power Consumption: The server consumes 30-40 watts during idle operation, with peaks of 60-70 watts during intensive backup tasks.
- Cooling Efficiency: The custom airflow design ensures that drive temperatures remain within safe limits, promoting long-term reliability.
- Noise Levels: The system operates quietly, making it an unobtrusive addition to home or office environments.
Its compact design also makes it easy to relocate, adding to its versatility and practicality.
Future Enhancements
While the current setup is highly functional, there are several planned upgrades to further enhance its capabilities:
- Finalizing backup configurations for Windows desktops and other devices to ensure comprehensive data protection.
- Optimizing VLAN settings for improved network management and streamlined communication between devices.
- Exploring additional backup solutions within the Proxmox ecosystem to expand the system’s versatility.
These enhancements will ensure that the backup server remains adaptable to evolving needs, providing a reliable and scalable solution for years to come.
Media Credit: Hardware Haven
Disclosure: Some of our articles include affiliate links. If you buy something through one of these links, Geeky Gadgets may earn an affiliate commission. Learn about our Disclosure Policy.