Canceling your Spotify Premium subscription is a straightforward process, but it requires specific steps that must be completed through the Spotify website. Unlike many other subscription services, Spotify does not allow you to manage or cancel your subscription directly through its mobile app. By following the outlined steps in the video below from Trevor Nace, you can ensure a smooth and efficient cancellation process while avoiding unnecessary confusion.

Step 1: Access the Spotify Website
To initiate the cancellation process, open a web browser such as Chrome, Safari, or any other browser you prefer. Navigate to Spotify’s official website by entering the URL directly or searching for it through a search engine. It is essential to ensure that you have a stable and secure internet connection to avoid interruptions during the process. Using a trusted device, such as your personal computer or smartphone, is recommended for added security.
Step 2: Log Into Your Spotify Account
Once you are on the Spotify website, log in using your account credentials, including your registered email address and password. If you have forgotten your password, you can use the “Forgot Password” option to reset it. In some cases, Spotify may prompt you to complete an email verification step to confirm your identity. This added layer of security helps protect your account from unauthorized access. Ensure you have access to the email address linked to your Spotify account to complete this step without delays.
Step 3: Navigate to Account Settings
After successfully logging in, locate the account settings section. This can typically be accessed by clicking on your profile icon or the gear icon, usually located in the top-right corner of the screen. From the dropdown menu, select the “View Account” option. This will redirect you to your account overview page, where you can manage various aspects of your Spotify account, including your subscription details.
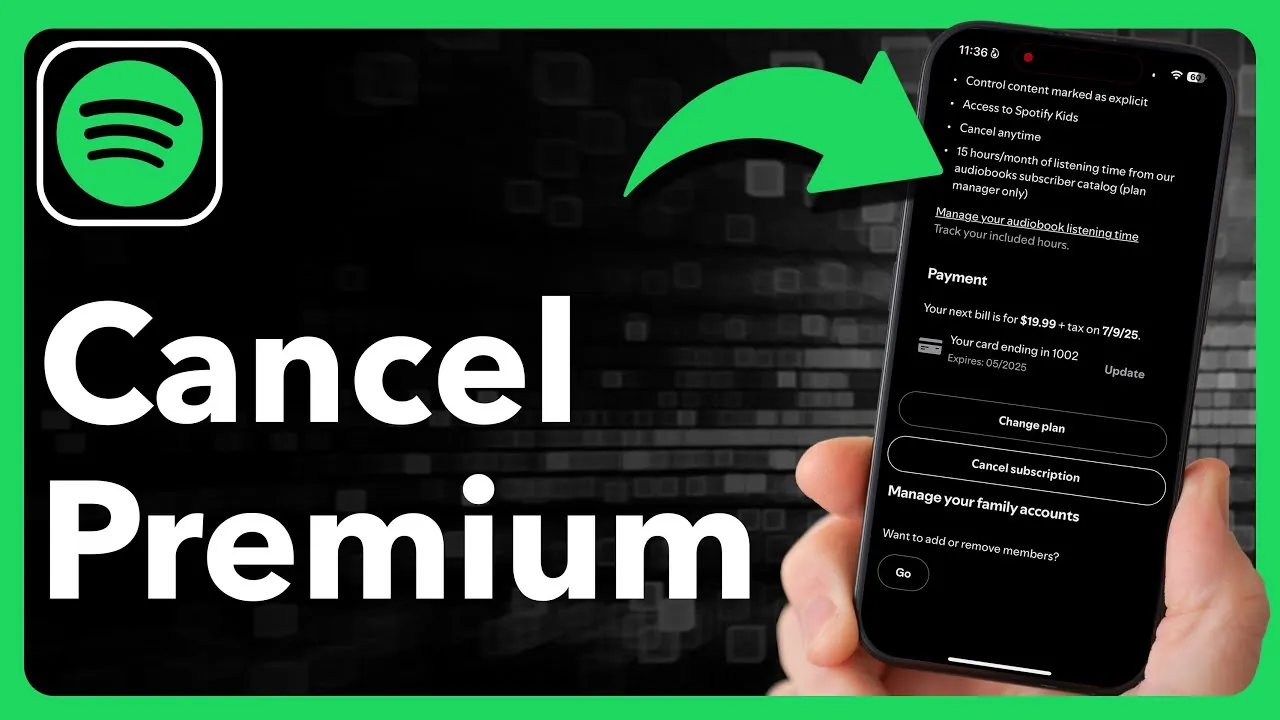
Step 4: Access Subscription Management
On the account overview page, scroll down to find the section labeled “Your Plan” or “Subscription.” This section provides an overview of your current subscription plan, including payment details and renewal dates. To proceed, click on the “Manage Your Subscription” option. This will open a new page where you can view additional details about your plan. To cancel your subscription, select the “Cancel Premium” or “Cancel Subscription” option. Spotify may display information about the benefits of staying subscribed, but you can proceed by confirming your intention to cancel.
Step 5: Confirm Your Cancellation
Spotify will guide you through a series of prompts to confirm your decision. These prompts are designed to ensure that you fully understand the implications of canceling your subscription. For instance, you may lose access to certain features such as offline listening, ad-free playback, and higher audio quality. Carefully follow the on-screen instructions and confirm your cancellation when prompted. Once completed, your subscription will be scheduled for cancellation at the end of your current billing cycle.
What Happens After You Cancel?
After canceling your Spotify Premium subscription, you will retain access to all premium features until the end of your current billing period. For example, if your billing date is the 20th of the month and you cancel on the 15th, you can continue enjoying premium benefits until the 20th. However, it is important to note that Spotify does not issue refunds for unused portions of your subscription. Therefore, timing your cancellation appropriately can help you maximize the value of your subscription.
Once your subscription ends, your account will automatically revert to the free version of Spotify. This version includes ads, limited skips, and other restrictions compared to the premium experience. If you decide to resubscribe in the future, you can easily upgrade your account through the same subscription management section.
Key Points to Keep in Mind
- Spotify Premium subscriptions can only be canceled through the Spotify website; the mobile app does not support subscription management.
- You may be required to complete an email verification step during the login process for security purposes.
- Access the “View Account” section to locate and manage your subscription settings.
- Follow all on-screen prompts carefully to confirm your cancellation and avoid any errors.
- Your subscription will remain active until the end of your current billing cycle, but Spotify does not provide refunds for unused time.
Additional Tips for Managing Your Subscription
If you are unsure about canceling your Spotify Premium subscription, consider exploring alternative options such as downgrading to a different plan. Spotify offers various subscription tiers, including individual, family, and student plans, which may better suit your needs and budget. Additionally, you can take advantage of Spotify’s free trial offers if you wish to test premium features before committing to a paid plan again.
For users who experience technical difficulties during the cancellation process, contacting Spotify’s customer support team can provide further assistance. The support team can help resolve issues related to account access, billing, or subscription management.
By understanding the steps involved and keeping these tips in mind, you can manage your Spotify subscription effectively and make informed decisions about your account.
Gain further expertise in Spotify Premium cancellation by checking out these recommendations.
- New Dyson Noise Cancelling Headphones Launched (Video
- SurFast Video Downloader: Lifetime Subscription | StackSocial
- iOS 26 Beta AirPods Update: New Features
- NOVA H1 noise cancelling earbud earrings (final hours)
- 2024 iPhone SE 4 may be cancelled
Source & Image Credit: Trevor Nace
Disclosure: Some of our articles include affiliate links. If you buy something through one of these links, Geeky Gadgets may earn an affiliate commission. Learn about our Disclosure Policy.