
If you are wondering, how you can format your camera’s SD card or prepare storage for your Raspberry Pi mini PC operating system or similar, using your Apple Mac computer. You will be pleased to know that it is very easy to format an SD card on the macOS system, especially if your Mac features an integrated SD card slot reader. This quick guide will show you how to format an SD card using a Mac desktop or laptop computer.
Secure Digital or SD is a proprietary non-volatile flash memory card format developed by the SD Association (SDA) for use in portable devices. SD storage cards can be used for a wealth of different applications from cameras to mini PCs, offering an affordable storage solution available in a wide variety of different capacities.
SD cards offer a convenient way to store and transport data, photographs, media and documents, as well as quickly load different operating systems onto a variety of different systems such as the Raspberry Pi and Arduino micro-controllers.
Using an SD card reader, the small storage cards can be read using a spare USB port or through a hub. Apple have also included SD card slots in their new range of MacBook Pro laptops this year making it even easier to access photographs and video from your camera’s or format the SD cards for other applications.
Format SD cards on Mac
You may need to format an SD card or micro SD card for several reasons on your Mac, whether it be for your smartphone, Raspberry Pi mini PC, Arduino project, digital camera or games console. Preparing a card for use using your Mac computer is extremely easy. But there are a few options to be aware of when formatting an SD card for the first time on Mac. Also, don’t forget formatting the SD or micro SD card will delete all the data on your SD card or micro SD card, so be careful to back up any data you may want to keep before formatting your SD card.
The correct format to choose
On our Mac computer will use the “Disk Utility” application provided by Apple on all Mac’s formatting our SDcard. If you have an iMac or older MacBook laptop, you may already have an integrated SD card slot which you can use to easily read and write to your card. If you have a modern MacBook or MacBook Air without an SD card slot, you will need an SD card USB-C adapter which you can slot into a spare USB-C port. To format the smaller form factor microSD cards, you will also need an SD card sized adapter into which you will slot the smaller microSD into as in the image below.
Once you have your card inserted into your Mac computer, either directly or via an SD card adapter, press the ‘Command’ and ‘Space’ button on your Mac keyboard to open a “Spotlight search” and type “Disk Utility” to locate and launch the application, as in the image above.
You can use a professional Mac Photo Recovery software to retrieve permanently deleted image files on Mac
In case you format your SD card on Mac by mistake, you can try a data recovery tool – EaseUS Data Recovery Wizard for Mac to help you get your deleted data back.
Using Disk Utility
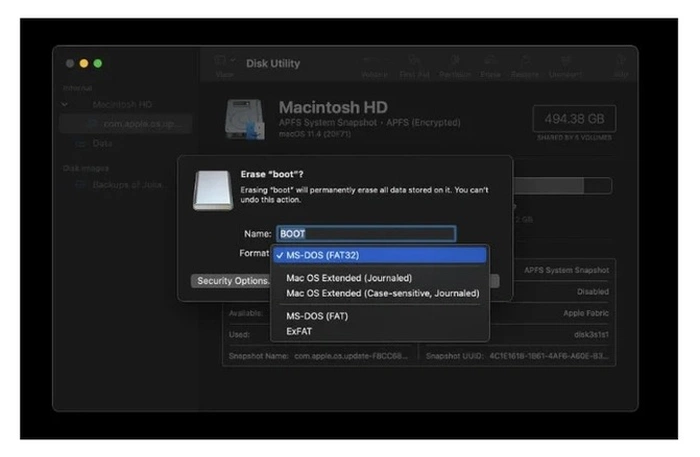
On the left-hand side of the Disk Utility application, you will see your drives listed. Be careful to select the correct drive for the SD card you are formatting. A quick check can be carried out by simply removing the memory card and reinserting to see which drive disappears and reappears as your Mac read the card. Right clicking on your chosen SD card drive will provide a list of options with ‘Erase’ listed at the bottom. ‘Erase’ is the option we will select to format our SD card on Mac.
A pop-up box will then appear allowing you to rename the SD card, keep it simple and don’t use any strange keyboard characters as some operating systems run into problems reading special character used when naming SD Card names, just stick to alphanumeric characters and you will be fine.
When formatting a card, you are presented with four ‘Format’ options on a Mac : MacOS Extended (Journaled), Mac OS Extended (Case-sensitive, Journaled), MS-DOS (FAT) and ExFAT. If you are going to use the formatted SD card ONLY on computers running Apples macOS, then the OS Extended formats are the choice for you. The only difference between the two is the ‘Case-sensitive’ option, which takes into consideration capitalization, so ABC and abc are considered being different names in the case-sensitive option. In the MacOS Extended (Journaled) format, which isn’t case sensitive, they are considered being the same.
If you are going to use your SD card in a digital camera, Windows PC, Android smartphone or Raspberry Pi mini PC for example and the SD card capacity is larger than 64 GB and you are formatting the SD card on a Mac system running a modern operating system version of macOS : Apple Lion macOS and above you will use the ExFAT option. For older Macs and smaller sizes of SD card use the MS-DOS (FAT32) option.
SD card format instructions :
- Open the Disk Utility app on Mac
- Select the correct SD card drive
- Name your SD card
- Select your desired Format Type : General purpose ExFAT – Only Mac computers : MacOS Extended (Journaled)
- Press the “Erase” button
- Wait for the SD card format on Mac to complete
- Remove your newly formatted SD card from your computer
Disclosure: Some of our articles include affiliate links. If you buy something through one of these links, Geeky Gadgets may earn an affiliate commission. Learn about our Disclosure Policy.