
Anyone searching for a function generator may be interested in a new DIY Arduino project which details how you can make your very own. “A function generator is a very useful tool, especially when we are considering testing our circuit’s response to a certain signal.” Explains its creator and Instructables member Faransky. Watch the demonstration video below to learn more about the Arduino project and tutorial which has kindly been published to the Instructables tutorial library to help you build your very own.
Features and Benefits of the DIY Function Generator
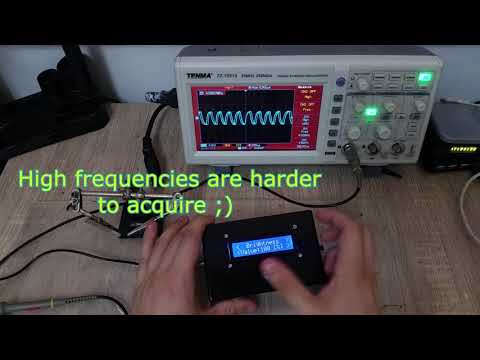
Features of the DIY function generator Arduino project include:
– Fully digital control: No need for passive analog components, which simplifies the design and enhances reliability.
– Modular design: Every sub-circuit is a pre-defined easy to use module, making it easier to troubleshoot and upgrade.
– Output frequency: Available range from 0Hz to 10MHz, providing a wide range of testing capabilities.
– Simple control: Single rotary encoder with built-in push button, making it user-friendly and intuitive.
– Li-ion battery for portable use: With external charging ability, ensuring that the device is portable and convenient.
– AC and DC coupling for output waveform: Allowing for versatile testing scenarios.
– LCD Brightness control: For energy consumption reduction, which is crucial for portable devices.
– Battery charge indicator: Keeping you informed about the battery status.
– Digital amplitude control: Providing precise control over the signal amplitude.
– Three available waveforms: Sine, triangle, and square, covering the most commonly used signal types in testing.
Building Your Own Function Generator
To build your own function generator, you will need a few essential components and tools. The project is designed to be accessible even for those who are relatively new to electronics and Arduino. Here are some additional details to help you get started:
1. Arduino Board: The heart of the project. An Arduino Uno or similar board will work perfectly.
2. Rotary Encoder: Used for adjusting the frequency and amplitude of the generated signals.
3. LCD Display: To show the current settings and status of the function generator.
4. Li-ion Battery and Charger Module: For portability and ease of use.
5. Signal Output Circuitry: Including operational amplifiers and other components to shape and output the desired waveforms.
The modular design of this project means that each part of the circuit can be built and tested separately before being integrated into the final device. This approach not only makes the project more manageable but also allows for easy upgrades and modifications in the future.
For full instructions, diagrams, and component lists, jump over to the Instructables website by following the link below. The detailed guide includes step-by-step instructions, making it easy to follow along and build your own function generator.
Source: Instructables : AB
Disclosure: Some of our articles include affiliate links. If you buy something through one of these links, Geeky Gadgets may earn an affiliate commission. Learn about our Disclosure Policy.