
A new Arduino project has been posted to the awesome Instructables website this week providing details on how you can create your very own Arduino laser pinball machine.
Sound exciting? If you are interested in using a few laser tripwires, solenoids, and erector set parts to build an Arduino controlled pinball machine, check out the video below for a demonstration or jump over to the Instructables website via the link at the bottom for full step by step Instructions.
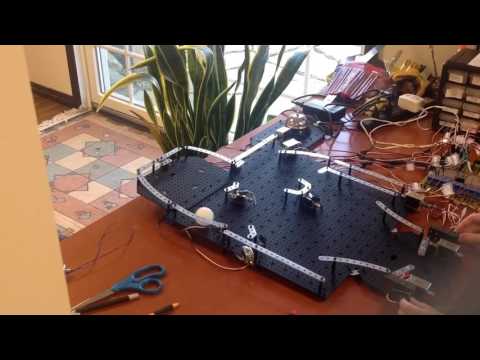
In a previous project, Arduino Ping Pong Pinball, I used solenoids and u-brackets to construct a pinball type game. However, in this earlier version, a solenoid had to be manually triggered to eject the ball from a target. Also, the game did not have true “flippers” to propel the ball. Thus I wanted to revamp the game to bring it more in line with a true pinball experience. I originally envisioned microswitch targets and ball lanes with rollover switches. However, a ping pong ball is far too light to trigger rollover switches or even mircoswitches. But a standard pinball is much too heavy to be propelled with the proper speed and too rough on the plastic playfield.
So, a ping pong ball had to suffice. I was able to fashion flippers from various erector set parts: metal rails, spacers, bolts, regular nuts and some self locking nuts. Solenoids are used to produce the lever action for the flippers. I used the “basket” type targets from the previous version, but I still needed a way to eject the ball automatically. That’s when I saw several instructables (Laser Tripwire Alarm, Arduino – Laser Tripwire Alarm System, and Super Easy Laser Tripwire, among others) using a laser tripwire. This worked perfectly as a way to eject the ball from the targets without any action by the player.
A bell is sounded each time a target is hit. Once for easy targets, two or three times for the more difficult targets. Score is kept automatically and is supposed to be displayed on an LCD. This worked fine in the previous version, but does not seem to work in the revamped game. The LCD library I am using employs I2C communication through analog pins 4 and 5. But for some reason the display does not work. I’ve included the Arduino code below. Any suggestions as to the problem would be most welcome.
Source: Instructables
Disclosure: Some of our articles include affiliate links. If you buy something through one of these links, Geeky Gadgets may earn an affiliate commission. Learn about our Disclosure Policy.