Canceling a subscription or free trial on your iPhone is a simple and efficient process that can be completed directly through the Settings app. This guide will walk you through the steps to cancel a subscription, explain how cancellations affect linked devices and Family Sharing, and provide practical tips for managing your Apple subscriptions effectively. The video below from Apple gives us more details.

1: Access Your Subscriptions
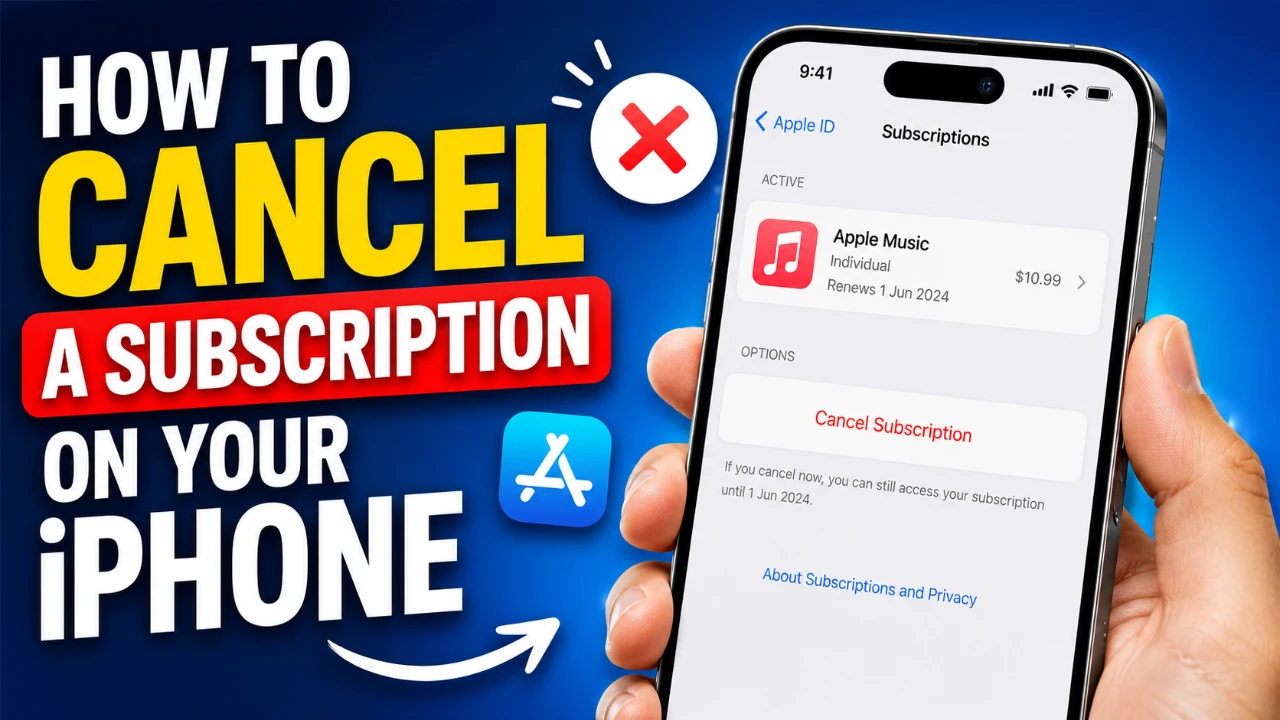
To start, open the Settings app on your iPhone. At the top of the screen, tap your name to access your Apple ID settings. From this menu, select Subscriptions. This section provides a detailed overview of all your subscriptions, divided into two categories:
- Active Subscriptions: These are ongoing services that automatically renew unless canceled.
- Inactive Subscriptions: These include services you’ve previously canceled or allowed to expire.
This clear categorization allows you to quickly identify which subscriptions are currently active and which are no longer in use.
2: Canceling a Subscription
Once you’ve accessed the Subscriptions section, locate the specific subscription you wish to cancel. Tap on it to open the details page, where you’ll find important information such as the renewal date and pricing. To cancel the subscription:
- Scroll to the bottom of the page and tap Cancel Subscription.
- A confirmation prompt will appear. Tap Cancel Subscription again to finalize your decision.
After completing these steps, the subscription will no longer renew at the end of the current billing cycle. However, you will retain access to the service until the billing period concludes.
3: What Happens After Cancellation
Canceling a subscription affects all devices linked to your Apple ID. If you’re part of a Family Sharing group, the cancellation will also impact other family members who share the subscription.
Here’s what you can expect after canceling:
- The subscription will remain active until the end of the current billing period, making sure you can continue using the service until then.
- In the Active Subscriptions section, the renewal date will be replaced with an expiration date.
- Once the subscription expires, it will move to the Inactive Subscriptions list for future reference.
These changes ensure you have a clear understanding of your subscription status and timeline.
4: Navigating the Settings App
The Settings app is designed to make subscription management intuitive and user-friendly. While reviewing your subscriptions, you can use the Back button in the upper-left corner to return to the main list. This allows you to explore other subscriptions or make additional changes without exiting the section entirely.
Additionally, the Subscriptions section provides a centralized location to manage all your Apple services, making it easy to stay organized and in control.
Managing Subscriptions Across Devices
Your Apple ID ensures that subscription details are automatically synchronized across all your linked devices. Any changes you make, such as cancellations, upgrades, or downgrades, will be reflected on your iPhone, iPad, Mac, and other Apple devices.
This seamless synchronization eliminates the need to repeat the process on multiple devices, saving you time and effort. Whether you’re at home or on the go, you can manage your subscriptions with ease from any Apple device.
Family Sharing and Shared Subscriptions
If you’re part of a Family Sharing group, shared subscriptions can impact all members of the group. For instance, canceling a shared plan like the Apple Music Family Plan will revoke access for everyone in the group at the end of the billing cycle.
Before making changes to shared subscriptions, it’s a good idea to communicate with your family members. This ensures that everyone is aware of the changes and can plan accordingly to avoid unexpected disruptions.
Practical Tips for Managing Subscriptions
To maintain control over your subscriptions and avoid unnecessary charges, consider these tips:
- Regularly review your Active Subscriptions to identify services you no longer use or need.
- Set reminders for renewal dates to ensure you’re aware of upcoming charges.
- Take advantage of the Inactive Subscriptions list to track previously canceled services and decide if you want to reactivate them in the future.
- For shared subscriptions, discuss changes with your Family Sharing group to ensure everyone is informed.
By following these practices, you can optimize your subscription management and make informed decisions about your Apple services.
Empowering Your Subscription Management
Canceling a subscription on your iPhone is a straightforward process that puts you in control of your services. By following the steps outlined in this guide, you can confidently manage your subscriptions, understand the implications of cancellations on linked devices and Family Sharing, and make informed choices about your Apple services. Whether you’re ending a free trial or discontinuing a paid plan, these tools and tips ensure a smooth and hassle-free experience.
Uncover more insights about Cancel subscription iPhone in the previous articles we have written.
- Apple’s Massive 2026 Roadmap: New Devices Coming After the M5 MacBook Pro
- The Apple Watch Ultra 4 Finally Addresses Its Only Major Flaw
- The MacBook Ultra Leak Just Revealed Apple’s Next Big Move
- iOS 27 Leaks Reveal the End of an Era: Apple’s New Priorities Confirmed
- What Apple Didn’t Tell You About Siri’s Intelligence
Source: Apple Support
Disclosure: Some of our articles include affiliate links. If you buy something through one of these links, Geeky Gadgets may earn an affiliate commission. Learn about our Disclosure Policy.