The Snipping Tool is a handy feature in Windows that allows you to capture a snapshot of any portion of your screen. It’s not just a screenshot tool; it also provides options for annotating, saving, and sharing the images you capture. This article will guide you on how to use the Snipping tool on Windows effectively together with shortcuts you can use to capture either parts or full screen pictures from your PC. You might also be interested to know that Apple provides a similar snipping tool for Mac which allows you to capture screenshots with ease.
For Windows 10 users, you have two simple methods to access the Snipping Tool:
- You can use the search function by selecting the Start menu, entering ‘snipping tool’ in the search box, then selecting the Snipping Tool from the results.
- Alternatively, you can use the shortcut key combination: Windows logo key + Shift + S.
For users on Windows 8.1 or Windows RT 8.1, you can swipe in from the right edge of the screen, select Search, enter ‘snipping tool’ in the search box, and then select the Snipping Tool from the list of results.
Shortcuts for using the snipping tool on Windows
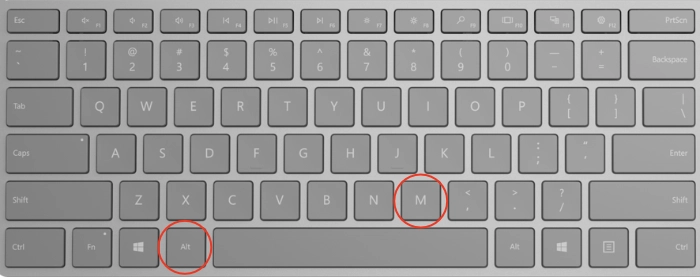
The Snipping Tool provides several keyboard shortcuts that you can use to make your work faster and easier such as Shift + Arrow keys: Move the cursor to select from different types of snips. Here are some other useful shortcuts for the Windows snip tool:
Alt + M Choose a snipping mode.
Alt + N Create a new snip in the same mode as the last one.

Alt + D Delay capture by 1-5 seconds.

Ctrl + C Copy the snip to clipboard.

Ctrl + S Save the snip.

Windows Snipping tool options
Once the Snipping Tool is open, you can start capturing snips. Select the ‘Mode’ option to choose the kind of snip you want. When you select a snip mode, your screen will change slightly to gray. This indicates that you can now select the area of your screen that you want to capture.
If you want to capture a snip of a menu, open the menu you want to capture, then press the Ctrl + PrtScn keys. Your screen will change to gray, including the open menu. Select the ‘Mode‘ or the arrow next to the ‘New’ button, then select the kind of snip you want to capture.
Annotating a Snip
The Snipping Tool also allows you to annotate your snips. After capturing a snip, you can write or draw on or around it by selecting the ‘Pen’ or ‘Highlighter’ buttons. If you make a mistake, you can use the ‘Eraser’ to remove the lines you’ve drawn.
Saving and sharing a Snip
To save your snip, select the ‘Save Snip’ button after capturing a snip. You can then choose the file name, location, and type before clicking ‘Save’.
If you want to share your snip, select the arrow next to the ‘Send Snip’ button, and then choose an option from the list.
Removing the URL from Snips
When capturing a snip from a browser window and saving it as an HTML file, the URL might appear below the snip. If you want to prevent the URL from showing, you can do so in the Snipping Tool’s options. Simply clear the ‘Include URL below snips (HTML only)’ checkbox.
Editing Snips
If you want to enlarge, rotate, or crop your snip, you can do so by selecting ‘Edit’ > ‘Edit with Paint 3D’. This option offers features for sizing, color, text, and many other enhancements.
Printing your Snip
You can print your snip directly from the folder where you saved it. Just right-click on the snip and select ‘Print’. You can then make choices for how you want to print your image.
Taskbar tool
For easy access, you can place the Snipping Tool on your taskbar. To do this, type ‘snipping tool’ in the search box on the taskbar. You will see the Snipping Tool app appear, and you can pin it to the taskbar for convenience.
The Snipping Tool on Windows is a versatile feature that allows you to take a snapshot of any part of your screen and work with it in various ways. Whether you’re capturing a screenshot for work, a tutorial, or personal reference, the Snipping Tool offers a host of functionalities that can enhance your productivity and efficiency.
For more information on using the Snipping tool on Windows jump over to the official Microsoft support website more details and directions on using the Windows operating system.
Disclosure: Some of our articles include affiliate links. If you buy something through one of these links, Geeky Gadgets may earn an affiliate commission. Learn about our Disclosure Policy.