As iPhone storage capacities increase each year with high-resolution photos and 4K videos, your iCloud storage and internal iPhone storage can fill up fast. Now it’s vital to ensure all your information is backed up iPhone to an external hard drive. While iCloud and iTunes remain popular backup options, storing an iPhone backup on an external hard drive has major perks for pace, control, security and convenience. And find waiting on cloud uploads and downloads a total time-suck? An external drive can back up and restore your iPhone in a flash, no internet is required.
Follow along with our three recommended methods for backing up your iPhone to an external hard drive. Whether you prefer a wired, wireless, Mac-based, or Windows-based option, we have the steps to get you started and resolve your top backup issues.
How to Backup iPhone to External Hard Drive with DearMob iPhone Manager
DearMob iPhone Manager is a premier iPhone backup solution that offers unparalleled control and flexibility. Far beyond the basic offerings of iTunes and iCloud, DearMob iPhone Manager provides a full set of tools to backup iPhone fully or selectively to external drives and seamlessly restore from backups whenever needed.
With DearMob iPhone Manager, you’ll never again worry about losing your treasured iPhone photos, messages, contacts, or any other data to unforeseen circumstances or if transitioning to a new iPhone. Its user-friendly interface makes creating full device backups or selecting specific types of data for backup as easy as a few clicks. All backups are stored on your own storage media of choice with military-grade encryption.
- Full Backup – 1:1 copy from iPhone in one click. Create backups without any data loss or quality degradation.
- Selective Backup – Handpick data types like photos, videos, music, messages, contacts, apps, and eBooks for backup. No need to backup what you don’t need.
- Encrypted & Secure – All backup data is encrypted using the Advanced Encryption Standard (AES) to keep your private information confidential.
- Restore & Transfer – Restore a backup to your iPhone with the freedom to select data in whole or part. You can also transfer backups to a new iPhone for fast migration and setup.
- Preview & Export – Browse through the contents of backups and export select data like photos, videos, messages, etc. as needed. Meanwhile, it lets you convert HEIC to JPG and compress large video files before exporting.
- No iCloud Required – DearMob iPhone Manager works independently of iCloud so you’re not limited by storage limits or subscription fees. All backups are saved locally on drives of your choice.
- Universal Compatibility – DearMob iPhone Manager supports all types of iPhone, iPad, and iPod running on iOS 7.0 and later.
Follow the steps below to backup iPhone to an external hard drive with DearMob iPhone Manager.
Step 1. Open DearMob iPhone Manager. Connect your iPhone to it via a USB or by joining the same Wi-Fi. Unlock the iPhone screen and Choose “Trust” to allow DearMob to access your iPhone.
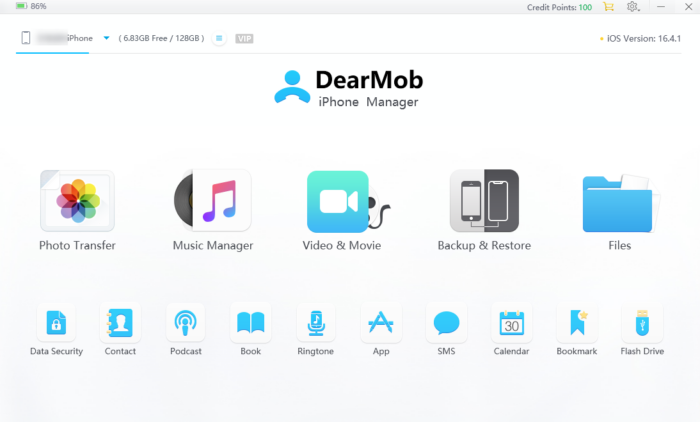
Step 2. Select “Backup & Restore” on the main interface. This is going to perform a full backup. If you only need to make copies of certain files, just click the module accordingly, such as “Photo Transfer”, “Music Manager”, “Video & Movie”, “Files”, or “Contact”.
Step 3. Click “Change Path” to customize the destination for the backup. It’s not recommended to back it up to the external hard drive directly, in case of any unexpected interruption and file corruption. Check “Encrypt your Back” if you want the files to be protected with your device backup password.
Step 4. Hit “Back Up Now”. When it completes, open the backup folder and copy the backup to the external hard drive connected to your computer.

How to Backup iPhone to External Hard Drive with Finder (Mac)
Finder has been the go-to app for navigating files and folders on the Mac for decades. In macOS Catalina, Apple enhanced Finder with the ability to not only browse external drives but also backup your iPhone to them. But note that if you have an older Mac, you need to use iTunes to back up your iPhone to an external drive. Now plug in your external hard drive to your Mac and see how to backup iPhone to an external hard drive with Finder.
Step 1. Connect your iPhone to your Mac. Open Finder, and select your iPhone in the sidebar. Click “Back Up Now”.

Step 2. Click “Manage Backups” and choose the backup file.
Step 3. Expand the drop-down menu and select “Show in Finder”.
Step 4. Open the backup folder in Finder/Library/Application Support/MobileSync/Backup/.
Step 5. Drag and drop it to the external drive in Finder “Locations” option.
Note: While Finder provides an easy way to free up space on your Mac, its iPhone backup capabilities are limited. It does not backup your TV shows, music, books, and podcasts. Since Catalina, Apple has reorganized these data types into separate apps which Finder cannot access for backup.
How to Backup iPhone to External Hard Drive with iTunes (Windows)
While iTunes is no longer available on Macs, Windows users can still utilize the media management software to backup their iPhones to external storage. iTunes provides a free, built-in way for those on Windows to backup their iOS devices to external hard drives and avoid paying for iCloud storage.
Step 1. Connect your iPhone and external hard drive to your PC via USB ports.
Step 2. Launch iTunes for Windows and it will detect your iPhone automatically. Now you just need to click on the phone icon on its interface.
Step 3. Navigate to Settings > Summary > Backups. Click “Back UP Now”.

Step 4. After backup finished, you can find the file in C:UsersAppDataRoamingAppleComputerMobileSyncBackup.
Step 5. Open the iPhone Backup folder, copy and paste the filed to the external hard drive.
Note: iTunes for Windows overwrites the previous backup of that device by default. It may be annoying when you want to roll back to a certain backup file.
Conclusion
While Finder and iTunes do provide built-in backup options for offloading your iPhone data to external storage, their lack of support for certain data types, customization, compatibility, and security means you’re likely better served using a third-party app to properly safeguard the important information on your iPhone.
With its unbeatable advantages in control, security, and storage, DearMob iPhone Manager is the premier tool for managing iPhone backups without the limitations of iCloud. Safeguard your digital life with this comprehensive yet intuitive solution.
Disclosure: Some of our articles include affiliate links. If you buy something through one of these links, Geeky Gadgets may earn an affiliate commission. Learn about our Disclosure Policy.