Sponsored:
Let’s face it – there are times when we all end up losing our important data due to all kinds of reasons. From accidental deletion to a corrupt hard disk, there could be different causes for an unwanted data loss scenario. The good news is that with the availability of free hard drive recovery software, you can easily get your lost files back. In this post, I will let you know about the best data restore tool and would also discuss some smart ways to recover data from a damaged hard drive.
Part 1: Common Scenarios for Data Loss from a Hard Drive
While there could be all kinds of reasons for losing your important files, here are some of these common scenarios:
-
Formatting of the hard drive for troubleshooting an issue.
-
Accidental deletion of some files from the hard drive.
-
The location or folder where your data is stored is not accessible anymore.
-
The hard drive could be corrupted by a malware entity (like a virus).
-
Any bad or corrupt sector/partition can also lead to the unavailability of the data.
-
There could be any hardware-related problem (damaged disk or connecting wires).
Part 2: Some Smart Ways to Recover Data from a Damaged Hard Drive
From accessing temporary files to using a data restore tool, there are a few smart ways to recover your lost files. Here are some of these data recovery techniques for hard drives that you can implement:
Tip 1: Go to the Recycle Bin/Trash of your System
If you have lost your data from the internal hard drive of your system, then you need to do this first. You might already know that when we delete something, it is temporarily saved in the Recycle Bin. Therefore, you can just go to the Recycle Bin/Trash of your computer and check if your data is there all along.
If you can find your lost files in Recycle Bin, then just select and right-click. Now, choose the “Restore” option that would send your files to their original location.

Tip 2: Check the Disk for Any Errors or Corrupt Sectors
At times, users can end up losing their data due to a corrupt disk as well. If your system is still working, then you can check the disk and get rid of any logical error from it.
-
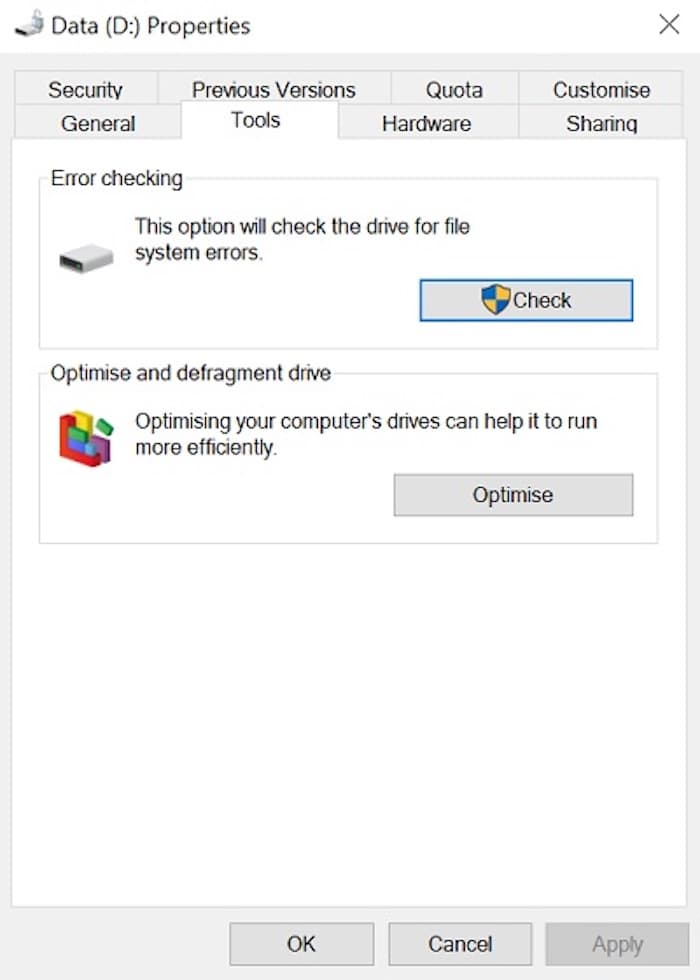
For Windows
Windows users can just go to This PC/My Computer and right-click the corrupt drive’s icon. Now, go to its Properties > Tools and click on the “Check” button under the “Error Checking” tab. This will open a new pop-up window that would scan your drive and will get rid of any logical error from it
-
For Mac
Similarly, Mac users can go to Applications > System Preferences > Utility to open the Disk Utility app. Now, select the drive from the sidebar and click on the “First Aid” button from the toolbar on the right. This will let you scan your hard drive and would fix all kinds of minor issues with it.

Tip 3: Try to Access Temporary Files
Apart from Recycle Bin, you should also access the temporary files in your system. This is because while the original file could be deleted, chances are that its temporary data might be present all along.
The easiest way to access temporary files is by launching the Run prompt as an administrator. Now, you just have to enter the “%temp%” command that would open your system’s temporary files.

You can also go to the Windows Drive > Username > AppData > Local > Temp to access your temporary data. If you want, you can also delete temporary files from here to fasten up the system’s processing.
Tip 4: Use a Data Restore Tool to get Better Results
Lastly, you can also use any free hard drive recovery software that can scan your computer or an external disk. Most of the data restore tools will only let you preview the results for free, but you have to get their premium versions to extract your files. Out of all the options out there, I would recommend Wondershare Recoverit Data Recovery. It is a user-friendly recovery tool that has one of the best recovery results and supports all data types.
Part 3: How to Use Wondershare Recoverit Data Recovery to Restore your Files?
Developed by Wondershare, Recoverit is one of the most popular DIY data recovery tools, which yields reliable results under all scenarios.
-
It supports data recovery from an internal disk or any external source like a hard drive, USB drive, and more.
-
The data restore tool supports recovery under all scenarios like a formatted disk, corrupt drive, malware attack, etc.
-
Wondershare Recoverit is fully compatible with all major file formats like FAT32, exFAT, NTFS, APFS, and so on.
-
It is a free hard drive recovery software that would let you preview your photos/videos/documents.
-
The tool has one of the highest data recovery rates and is also compatible with Apple’s latest M1 and T2 chipset. This can drastically fasten the data recovery results on Mac.
If you also want to use this data restore tool to recover your lost files, then follow this basic drill.
Step 1: Select a Hard Drive (or any other location) to Scan
At first, just launch Wondershare Recoverit and pick a location from where you lost your data. You can select any partition, external hard disk, or even browse to a specific folder of your choice.

Step 2: Let the Application Scan the Location
Once you start the process, the data restore tool will start scanning the selected location or hard drive. You can also check the progress of the scan from an indicator on the interface.

Step 3: Preview your Files and Restore them
After the scanning phase is over, you can just check the recovered data, listed under different categories. There are also all kinds of filters and an inbuilt search option to help you look for specific files.

In the end, you can just preview your photos, videos, and documents on the native interface of Recoverit. Select what you wish to get back and click on the “Recover” button to save your files to any location of your choice.

I’m sure that after following these tips, you would be able to successfully recover your lost or inaccessible data. Ideally, using a reliable data restore tool like Wondershare Recoverit would be the best bet. Since it is a free hard drive recovery software, it will let you restore your important files without any hassle.
Disclosure: “This is a sponsored post. Geeky Gadgets has been compensated for this post.”
Disclosure: Some of our articles include affiliate links. If you buy something through one of these links, Geeky Gadgets may earn an affiliate commission. Learn about our Disclosure Policy.