Effectively managing your Mac’s storage and maintaining optimal performance often begins with removing unused applications. While the process may seem simple, there are several important factors to consider, such as dealing with leftover files and managing subscriptions tied to the app. The video below from Apple provides detailed, step-by-step instructions to help you uninstall apps thoroughly and efficiently while addressing these additional considerations.

Steps to Delete Apps on Your Mac
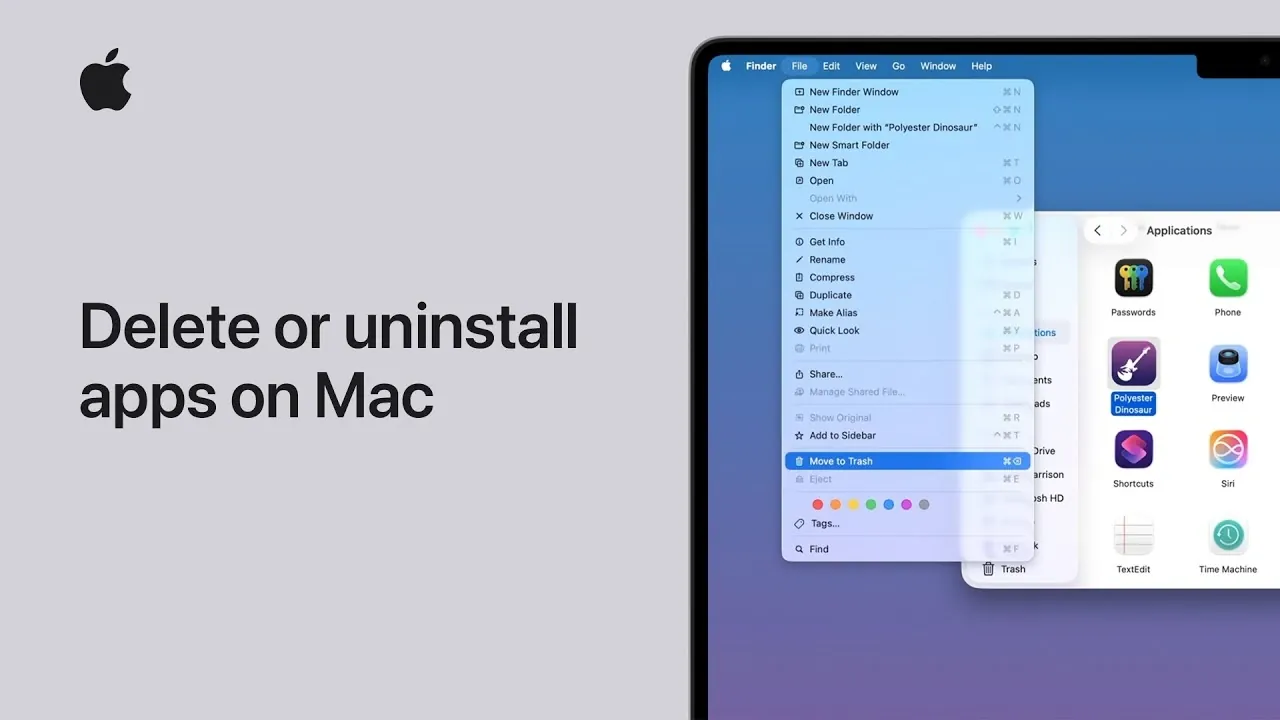
Removing an app from your Mac is a straightforward process, but following the correct steps ensures the task is completed without errors:
- Open Finder and navigate to the Applications folder.
- Locate the app you want to delete. If the app is currently running, quit it to avoid potential issues.
- Drag the app icon to the Trash in your Dock, or select the app, click the File menu and choose Move to Trash.
- If prompted, authenticate the action using Touch ID or by entering your administrator username and password.
- To permanently remove the app, right-click the Trash icon and select Empty Trash. Confirm the action if required.
While these steps remove the app itself, some residual files may remain on your system. Addressing these leftover files is crucial for a complete cleanup.
Handling Leftover Files
Uninstalling an app does not always remove all its associated files, such as preferences, caches, or other data stored in hidden system folders. Although these files are typically small, they can accumulate over time, taking up unnecessary space. To ensure a thorough cleanup, consider the following methods:
- Use Finder to search for the app’s name and manually delete any leftover files. Exercise caution to avoid accidentally removing critical system files.
- Use third-party uninstaller tools, which are designed to safely identify and remove associated files. These tools are particularly useful for larger apps that leave behind extensive data.
By addressing these residual files, you can free up additional storage space and maintain a clutter-free system.
Managing Active Subscriptions
Uninstalling an app does not automatically cancel any active subscriptions linked to it. If you subscribed to a service through the app, you’ll need to manage the subscription separately to avoid unnecessary charges. Follow these steps to cancel subscriptions:
- Open the App Store on your Mac.
- Click your profile icon in the lower-left corner and select Manage under Subscriptions.
- Locate the subscription associated with the app and follow the prompts to cancel it, if necessary.
Failing to cancel a subscription may result in continued billing, even after the app has been removed from your system.
Authentication and Security
When deleting certain apps, macOS may require authentication to confirm the action. This security measure ensures that only authorized users can make significant changes to the system. If your Mac supports Touch ID, you can use it for quick and secure approval. Otherwise, you’ll need to enter the administrator username and password. This added layer of security protects your system from unauthorized modifications.
Optimizing Storage on Your Mac
Regularly reviewing and removing unused apps is an essential part of effective storage management. To gain a better understanding of your Mac’s storage usage, follow these steps:
- Click the Apple menu and select About This Mac.
- Navigate to the Storage tab to view a detailed breakdown of what’s occupying space on your system.
In addition to uninstalling apps, consider implementing these storage optimization tips:
- Empty the Trash regularly to free up space.
- Review large files or downloads and delete those you no longer need.
- Enable macOS’s built-in storage optimization features, such as storing files in iCloud or automatically removing old files from the Trash.
By adopting these practices, you can ensure your Mac remains efficient, organized, and free of unnecessary clutter.
Unlock more potential in Delete apps on Mac by reading the previous articles we have written.
Source & Image Credit: Apple Support
Disclosure: Some of our articles include affiliate links. If you buy something through one of these links, Geeky Gadgets may earn an affiliate commission. Learn about our Disclosure Policy.